Improving Deadly Premonition 2 using HarmonyX and MelonLoader
At the moment of writing, Deadly Premonition 2’s PC port was released almost a month ago. I started working on it almost the moment I heard about how bad the PC port is and worked on it pretty much continuously for over 3 weeks, either investigating what could be improved, experimenting (in Unity 2018.4.16) or just trying to play through the game to see if anything major gets broken by my changes.
Now that my playthrough is finished, I will be moving away from active development to more of a support. This does not mean, no further updates for my hack get released - I started working professionally with Unity about a year and a half ago - there is still quite a lot for me to learn about it - so if I get to know anything that could be retrofitted to the hack, I probably will. Nevertheless, the development will slow down significantly now.
This is a bit of a write-up on what changes I have made and how I have made them. The current version of the hack can be here
Il2cpp and what it implies
One of the issues and complaints levelled against Unity a lot of the time is that the performance of Unity is really bad, due to it using C#. This is true to some extent, but these claims are generally exaggerated. Unity in the right hands can perform fast, really fast! Even when using Managed code! (see Warhammer 40,000: Mechanicus, Art of Rally or Overload)
Unity itself doesn’t even use .NET and instead relies on its own fork of Mono, which allows to easily develop games that are targetting multiple platforms. By default, Unity will compile the game to use Managed libraries - these libraries don’t contain code that the CPU can understand and instead contain Common Intermediate Language code (at least to my understanding), also known as IL code. When the application is run and a call to a method is made, this code is then processed at runtime to a code that the CPU can execute (Just-in-time compilation - JIT). This has a few problems.
One of those (although extremely beneficial for modding) is that Managed libraries are easy to read with programs like ilSpy or dnSpy, which can convert IL code to a “lowered” C# code. While you can’t obtain the original code using it, the form of code that can be obtained is easily readable (for a programmer) and still close to original code. This representation lacks many of C#’s high-level features and variable names used inside methods but allows to have a pretty good look insight into the game.

For comparison, in the case of C/C++ the code is compiled almost directly to a form that the CPU can understand and stripped of all of its variable names, as the CPU doesn’t need them for its operations. The code is often optimised to be run fast (often using special registers inside CPU to handle vectors) and libraries are loaded at applications startup into RAM - thanks to that approach, if provided proper data and CPU stack, these methods/functions can be executed instantly, which matters very much for applications where CPU performance is important - such as video games. The downside is that - this often requires programmers to be very careful about memory allocation, as there are very few protections, that prevent access violation (where a CPU tries to access a part of unallocated memory) or memory leaks (where an object is created in memory, but the pointer that point to it is lost, without deallocating the memory space) - the latter, of course, has many modern and fast workarounds now (as for the former - I don’t know, as I am not have spent enough time with C/C++).
Unity Technologies is fully aware of the costs that JIT adds to running high-fidelity video games. To work around it, without straight-up forcing everyone to use a different language, they have come up with a solution, which - in many cases - can be implemented with just a few clicks known as il2cpp (Intermediate Language To C++). As the full name implies, this solution adds a process when building the game in Unity, which takes IL libraries, converts them to a C++ code and then uses it to build native binary libraries. Such libraries - as far as I know - always run faster (as long as the limiting factor is the CPU) and limit the amount of stuttering possible. The difference is almost instantly noticeable when you try loading a level that was built with Mono compilation vs. Il2cpp compilation. Il2cpp is not without its flaws, as sometimes, it can affect final builds stability, but - having worked with a project that use it for compilation and seeing how it improved games that had performance issues (such as Underworld Ascendant) - I am extremely impressed with results it can produce.
Don’t get me wrong, there is still some garbage collection happening in the background (which has to happen using Unity’s main thread!), but thanks to il2cpp (and many additional optimisations and components like DOTS), Unity can bring its performance very close to the level of its competition. Il2cpp also adds a layer of security - as the original Il code is no longer available for people (like me) to easily read and understand. It’s not the ultimate security solution, as you can still use some tools to find out addresses where native code is located and try to reverse engineer it to its original form, but that is a long, frustrating and time-consuming process.
Deadly Premonition 2 is one of those games that use Il2cpp. MelonLoader comes with a bunch of tools and libraries to obtain Unhollowed libraries - this is useful, as they provide a point to which code can be hooked by name (instead of address or signature), not to mention access to variable names and general class structure (although that one has some additional garbage information, which is required for Il2cpp). This is what I used to fix some of the game issues, improve graphics etc with my hack.
HarmonyX and code hooking
HarmonyX is a fantastic library that can be used to hotpatch the game’s method. Its structure is a bit weird and hard to understand, but after some time getting used to it, it’s hard not to love it. The first step required is of course installing MelonLoader (as it comes with HarmonyX and Unhollower) and running the game, so Managed libraries can be generated from Unity. These libraries can then be added as references in Visual Studio or Rider.
Let’s say, for example, we want to prevent the game from forcing a resolution at start-up - something I have done, as DP2 forces 1920x1080 resolution at startup. As long as it’s not an extern call, class constructor or override of a method inherited from another class, the process with HarmonyX is fairly straightforward. If you have worked with Unity, you know that the display method will be set using Screen.SetResolution() - there is a couple of them, but with a process of elimination we can figure out which one exactly is used. In Deadly Premonition 2’s this one is used:
Screen.SetResolution(int width, int height, bool fullscreen)
So to hook it, we create a class with a method and parameters like this:
[HarmonyPatch]
public static class ScreenHook
{
    [HarmonyPrefix]
    [HarmonyPatch(typeof(Screen), "SetResolution", new Type[] { typeof(int), typeof(int), typeof(bool) })]
    public static bool SetResolution1()
    {
        return false;
    }
}
I am not 100% sure if the first [HarmonyPatch] attribute is needed, but the second (right above SetResolution1) certainly is. What it does is it essentially tells Harmony that we want to find a class Screen and in it find a method SetResolution, which takes arguments int, int and bool and we want to hook it (that last part is not needed if only one method under the same name exists).
What [HarmonyPrefix] does it tells HarmonyX, that we want to hook it in the way, that we execute the content of SetResolution1() before the original code is executed. Alternatively, we can execute the code after the original method’s code is executed by using the attribute [HarmonyPostfix].
Now the confusing part about HarmonyX’s syntax is that bool does not refer to a type returned by the original method. Instead, it refers to “whatever we want the original method to be executed or not”. If we return true, the original method gets executed, if we return false, it gets skipped. This is only possible when using HarmonyPrefix. And so with these few lines, we prevent the game from applying the original resolution.
For more information, you can see HarmonyX’s wiki.
What’s great, is that despite the methods having to be static, it is possible to obtain a reference to the original object by adding __instance as the method’s argument, as well as the original arguments by using their names:
[HarmonyPatch]
public static class ScreenHook
{
    [HarmonyPrefix]
    [HarmonyPatch(typeof(Screen), "SetResolution", new Type[] { typeof(int), typeof(int), typeof(bool) })]
    public static bool SetResolution1(Screen __instance, int width, int height, bool fullscreen)
    {
        return false;
    }
}
We can also access the class’ fields (even if they are private!), by providing a reference type of the field and its name, with ___ as its name prefix. For example, if we have a class:
public class CameraMoverMainMenu : MonoBehaviour
{
    private Transform CarCameraTargetTransform;
    private float CarChoooserZoomLevel = 13f;
    public Transform CareerTransform;
    public Transform CarUnlockedTransform;
    private bool HasInitialized;
    private float InitialZoomLevel;
    private Transform RallyCompleteCameraTarget;
    private Vector3 StartingPosition;
    private Quaternion StartingRotation;
    private Camera TheCamera;


    private void Start() {}
    private void Init() {}
    public void SetCarCameraTarget(Transform t) {}
    public void ZoomIn() {}
    public void ZoomOut(bool showDiorama) {}
}
We can easily hook it with the code:
[HarmonyPatch]
public static class SomeOtherClassNameIrrelevant
{
    [HarmonyPrefix]
    [HarmonyPatch(typeof(CameraMoverMainMenu), "ZoomIn")]
    public static bool Hook(CameraMoverMainMenu __instance, bool showDiorama, ref Transform ___RallyCompleteCameraTarget)
    {
        return false;
    }
}
Not only do we obtain a reference to an object instance, but we also have a value of argument the method was just called with and we have a value of the private field of the class… and we can prevent original code from being executed - all without the need to having to write low-level code!
Monobehaviours with Il2cpp
When not using Entity Component System, Unity generally operates by processing mono behaviours from GameObjects, which are paired with Transforms to exist somewhere in the scene. Transform describes its position in hierarchy in object hierarchy (moving parent of the transform, moves the child transform, while preserving its local position, local rotation and local scale in relation to its parent), but also gives access to its world position and world rotation, as well as few other useful features (like Matrix4x4), massivily simplifying math that is needed to be done when writing code.
GameObject describes elements such as - which Unity layer is used (useful for handling collisions and rendering), whether it is “Active” or not, which scene it belongs to etc. To GameObject, scripts (MonoBehaviours) can be attached, to perform actions, which are then handled by Unity in update cycles, see Execution Order.
When using MelonLoader (or BepInEx), a plugin named Unity Explorer can be used to have a look and manipulate game objects in the scene. It gives great insight into how the prefabs used by developers and the game world were constructed, what mono behaviours (components) are attached to it etc.
With MelonLoader (especially when combined with HarmonyX) it is also possible to add new components that will execute additional code. With Il2cpp however, there are a few additional steps that need to be done. Let’s just say we have a basic Monobehaviour that moves us 0.1 up each frame.
public class ExampleBehaviour : MonoBehaviour
{
    private void Update()
    {
        this.transform.position += Vector3.up * 0.1f;
    }
}
And let’s just use HarmonyX to attach it to CharaControl to the correct object when it gets Initiated
[HarmonyPatch]
public static class CharaControlHook
{
    [HarmonyPostfix]
    [HarmonyPatch(typeof(CharaControl), "Init")]
	public static void CharaControlHookInit(CharaControl __instance)
    {
        //Check if we haven't already added it
        if(__instance.GetComponent<ExampleBehaviour>() == null)
        {
            __instance.gameObject.AddComponent<ExampleBehaviour>();
        }
    }
}
While this will likely work with the Mono Compiled game, it will fail with the Il2cpp compiled one. To make it work, we need to add a few more things to MonoBehaviour. The first thing is the [RegisterTypeInIl2Cpp] attribute and then we need a constructor with a pointer.
[RegisterTypeInIl2Cpp]
public class ExampleBehaviour : MonoBehaviour
{
    public ExampleBehaviour(IntPtr ptr) : base(ptr) { }

    private void Update()
    {
        this.transform.position += Vector3.up * 0.1f;
    }
}
There are a few other quirks. obj.GetType() won’t work for example and UnhollowerRuntimeLib.Il2CppType.Of<T>() or obj.GetIl2CppType() have to be used. Coroutines require running using MelonCoroutines.Start(__coroutine__here__);. A good point of reference is MelonLoader’s wiki.
Fixing stuff - FixedUpdates and Character interpolation
Deadly Premonition 2 has plenty of things to fix - one, already mentioned, which relates to resolution, which I have already covered. The other common complaint was the character movement which seems to be stuttering. This is a common problem with many Unity games, as the developers opted to handle its movement using FixedUpdate - the characteristic of which is that, it is not tied with the rendered framerate and instead suppose to run a fixed amount of time per second. The number of updates per second can be configured in Unity, but most games use a value of 50 times a second (delta time of 0.02) and so does DP2. This isn’t too much of a problem on Switch (which runs badly as it is), but on PC, where obtaining a framerate of 60 or even higher is pretty much a standard - this ends up being noticeable. If you need a graphical example, I recommend checking “Fix jittery camera movement in Unity with Rigidbody Interpolate” at Terresquall Blog’s or “Timesteps and Achieving Smooth Motion in Unity” at Kinematic Soup’s blog.
To fix that issue, I have decided to write 2 mono behaviours. One, which gets attached to objects that need to be interpolated, which writes down their position in fixed updates and one which gets attached to the camera, which does the interpolation, by disabling rigid bodies, storing their original position and rotation before the frame gets rendered and then moving them and rotating using linear interpolation in OnPreCull method. Then, after the frame gets rendered, the component moves them back to their original positions, restoring velocities and state in OnPostRender (this only works when mono behaviour is attached to a game object that has a camera). Such approach also allowed me to easily control situations, where not to use interpolation (for example during cutscenes), by simply setting flags inside the component responsible for interpolation inside the camera. There was one major bug related to it, which caused York to start hovering at times and prevent him from falling, which I bypassed by just adding a gravity acceleration if Y velocity was 0. Due to glitches with side characters - I opted out not to interpolate their movement. At times, the calculation isn’t entire perfect either, as you can see York warp back, but it is hard to pin point what exactly causes that.
There is also an issue with the physics simulation of clothes, which are updated per frame but using Update (so before we move the character to interpolated position). I did try to write my workaround around it, but sadly it has not worked. But on the positive side - these clothes glitch out even without my interpolation :)
Fixing stuff - Controller prompts + keyboard and mouse support
Another element that needed fixing was gamepad prompts. The original bindings are just confusing and counterintuitive, as the “Cancel” button for the menu is by default bound to Xbox’s A, instead of “B” like it is the unwritten standard (or occasionally X). Since the game uses SteamInput, it is possible to just flip those via Steam, but that leaves us with a situation where prompts are incorrect. So, to fix that issue, I had to hook a component responsible for displaying prompts. I was originally expecting the game just to use standard Unity UI (as that has been introduced - I think in - 2013 to Unity), but - for whatever reason and to my surprise - it turned out the game uses a third-party component NGUI. This was a problem, as to replace those prompts, I needed to find an older version of NGUI (as the most recent version of NGUI uses different atlases), but also not the “Free” version, which turned out to be way too old. I managed to do so and use it to preper replacement alases in Unity 2018.
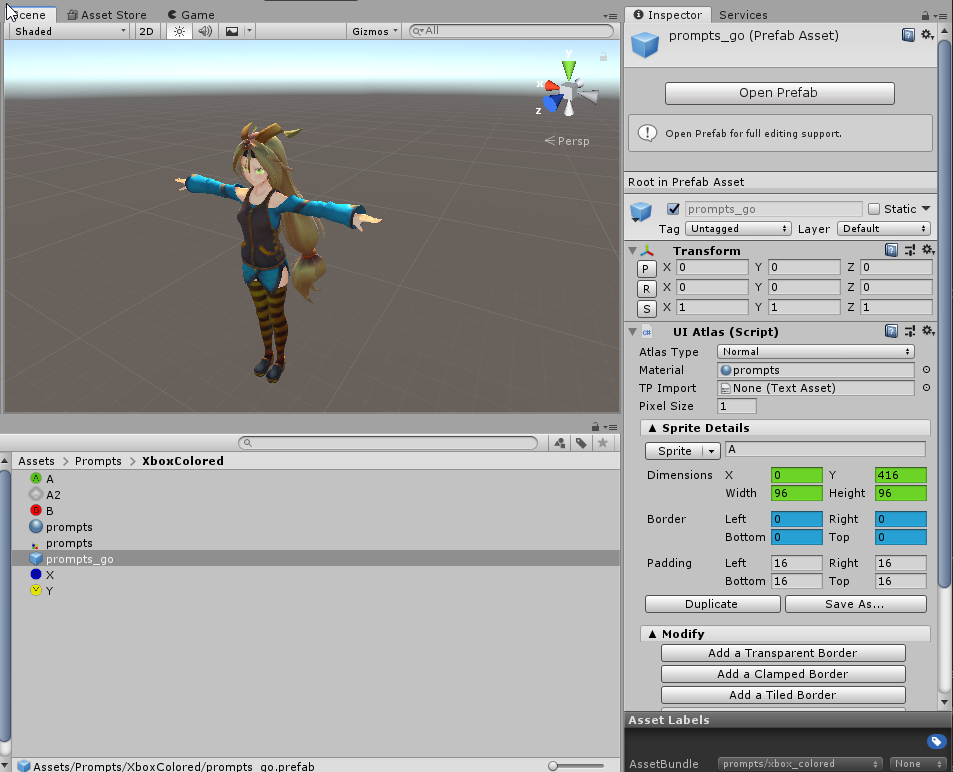
Then I marked the atlases, materials and game objects to be a part of an asset bundles and generated an asset bundle for each of the controller layouts. Then it was all a matter of making sure these asset bundles get loaded using my hack/mod, instantiating a proper game object, tagging it to not be destroyed on scene change and setting a static reference.
void Awake()
{
    if (SuisHackMain.Settings.Entry_Other_Prompts.Value != "" || SuisHackMain.Settings.Input_Override.Value == ExposedSettings.InputType.KeyboardAndMouse)
    {
        var assetBundlePath = SuisHackMain.Settings.Entry_Other_Prompts.Value;
        this.ReplacementTypeUsed = ReplacementType.Basic;
        if (SuisHackMain.Settings.Input_Override.Value == ExposedSettings.InputType.KeyboardAndMouse)
        {
            this.ReplacementTypeUsed = ReplacementType.KeyboardAndMouse;
            assetBundlePath = "keyboard";
        }

        string path = Path.Combine(Path.Combine(Application.streamingAssetsPath, "prompts"), assetBundlePath);
        SuisHackMain.loggerInst.Msg("Trying to load replacement prompts using bundle: " + path);

        var assetBundle = AssetBundle.LoadFromFile(path);
        if (assetBundle == null)
        {
            SuisHackMain.loggerInst.Error("Failed to load asset bundle!");
            return;
        }

        //Load game object
        var assets = assetBundle.LoadAsset("prompts_go");
        if (assets != null)
        {
            var cast = assets.TryCast<GameObject>();
            if (cast != null)
            {
                if (cast.GetComponent<UIAtlas>() != null)
                {
                    var instanitate = GameObject.Instantiate<GameObject>(cast);
                    instanitate.transform.SetParent(this.transform);
                    instanitate.transform.localPosition = Vector3.zero;
                    instanitate.transform.localRotation = Quaternion.identity;
                    Atlas = instanitate.GetComponentInChildren<UIAtlas>();

                    switch (ReplacementTypeUsed)
                    {
                        case ReplacementType.KeyboardAndMouse:
                            Cache = new PromptCacheKeyboard(Atlas);
                            break;
                        default:
                            Cache = new PromptCacheBasic(Atlas);
                            break;
                    }
                }
                else
                {
                    SuisHackMain.loggerInst.Error("Atlas Game object was found, but UIAtlas was null. Crap!");
                    return;
                }
            }
            else
            {
                SuisHackMain.loggerInst.Error("Atlas game object cast failed - object might be invalid.");
                return;
            }
        }
        else
            SuisHackMain.loggerInst.Error("Failed to find Xbox atlas... fuck!");

        if (Atlas != null)
            SuisHackMain.loggerInst.Msg("Replacement atlas loaded correctly!!");
    }
}
Finally, I need to hook the proper component to check the static reference if there exists a replacement for the prompt and use it if it exists.
public static void UISpriteOn(UISprite __instance)
{
    if (GlobalReplacementAtlas.Instance != null && __instance.mSpriteName != null)
    {
        switch (__instance.mSpriteName)
        {
            case "NX_Cont_Button_A":
                GlobalReplacementAtlas.Instance.Replace(__instance, GamepadKeyIcons.A);
                break;
            case "common_intaract_A":
                GlobalReplacementAtlas.Instance.Replace(__instance, GamepadKeyIcons.A2);
                break;
            case "NX_Cont_Button_B":
                GlobalReplacementAtlas.Instance.Replace(__instance, GamepadKeyIcons.B);
                break;
            case "NX_Cont_Button_X":
                GlobalReplacementAtlas.Instance.Replace(__instance, GamepadKeyIcons.X);
                break;
            case "NX_Cont_Button_Y":
                GlobalReplacementAtlas.Instance.Replace(__instance, GamepadKeyIcons.Y);
                break;
		}
	}
}
I did use manual patching in this case, because using [HarmonyPatch] attributes causes a class to be automatically patched and I needed patching to happen depending on whatever settings are set.
public static void Initialize()
{
    if (SuisHackMain.Settings.Input_Override.Value == ExposedSettings.InputType.SteamInput)
    {
        var source = typeof(UISprite).GetMethod(nameof(UISprite.OnInit), System.Reflection.BindingFlags.Instance | System.Reflection.BindingFlags.Public);
        var target = typeof(GamepadPrompts).GetMethod(nameof(GamepadPrompts.UISpriteOn), System.Reflection.BindingFlags.Static | System.Reflection.BindingFlags.Public);

        if (source == null)
        {
            SuisHackMain.loggerInst.Msg("Failed to find source method for GamepadPrompts");
            return;
        }

        if (target == null)
        {
            SuisHackMain.loggerInst.Msg("Failed to find target method for GamepadPrompts");
            return;
        }

        SuisHackMain.harmonyInst.Patch(source, postfix: new HarmonyMethod(target));
        SuisHackMain.loggerInst.Msg("Initialized GamepadPrompts patch");
    }
}
I hooked the UISprite in a similar way when using Keyboard and Mouse hook. I am not entirely happy with keyboard and mouse support, as - without original code - it required me to:
- Write a binary patcher to modify “globalgamemanagers”, which contains Unity Axis definitions
- Hook SteamInput to prevent it from reading the gamepad and instead when methods are called, check which input is used and then pass it to either Unity’s
Input.GetKey(KeyCode key)orInput.GetAxis(string axis)methods. I tried also to prevent SteamInput from initiating, but sadly it seems like for the calls to be handled properly, it has to be running, which means that if you want to use Keyboard and mouse to play Deadly Premonition 2, you need a controller that SteamInput detects. Thankfully, it can be a virtual controller and it will work (tested with vXbox).
To make PC input at least slightly more bearable, I do try and detect game state (namely whatever the player is in the menu, in normal gameplay, looking at the map etc.) and then swap input and keyboard/mouse prompts on the fly. For example - when looking at the map, on the controller, you’d normally be using the left stick to move the pointer (in the middle of the screen) and press A (or B) to set a waypoint. If translated directly to keyboard and mouse, that would mean using a map with WSAD and pressing E to set a waypoint marker. Instead, what I do is swap inputs, so that mouse is used for moving the cursor and the left mouse button is used for setting up a waypoint. Mouse wheel up and down can be used then to zoom in/zoom out the map (in addition to Numpad + / Numpad -).
Fixing stuff - Wires geometry
One of the things I noticed quite early when playing the game is that electrical wires seem to disappear. At first, I thought this was an issue with LOD Groups, but upon further investigation, it turned out to be something more trivial. You see, rendering elements is a complicated matter and one of the ways to speed it up is to use more basic shapes to figure out whatever the elements (or their shadows) are visible on the screen. And some of the most basic ways to check is to essentially put an entire model inside of a box, as the math requires to check if something is inside of the box or if any of the box’s faces are visible on the screen is fast and straightfoward.
One issue is that wires often have varied lengths - more or less the amount of length needed to connect point A with B (with a bit of an overhead to account for thermal expansion, poles moving slightly further and closer to each other in the wind etc.). So if you don’t want to create separate meshes and store them in-game files for each connection between the poles, what can be used is either a vertex shader that is going to stretch one mesh (model) between 2 points or bones. Bones nowadays are an old technology - they started to be used in video games around the 2000s (Half-Life famously proud itself of having skeletal animations) and whilst the intention behind was generally to use it for organic shapes, nothing is stopping developers from applying it to elements like wires. This is exactly what the developers of Deadly Premonition 2 did, as each wire is the same model, that is being transformed using a single bone going from point A to B.
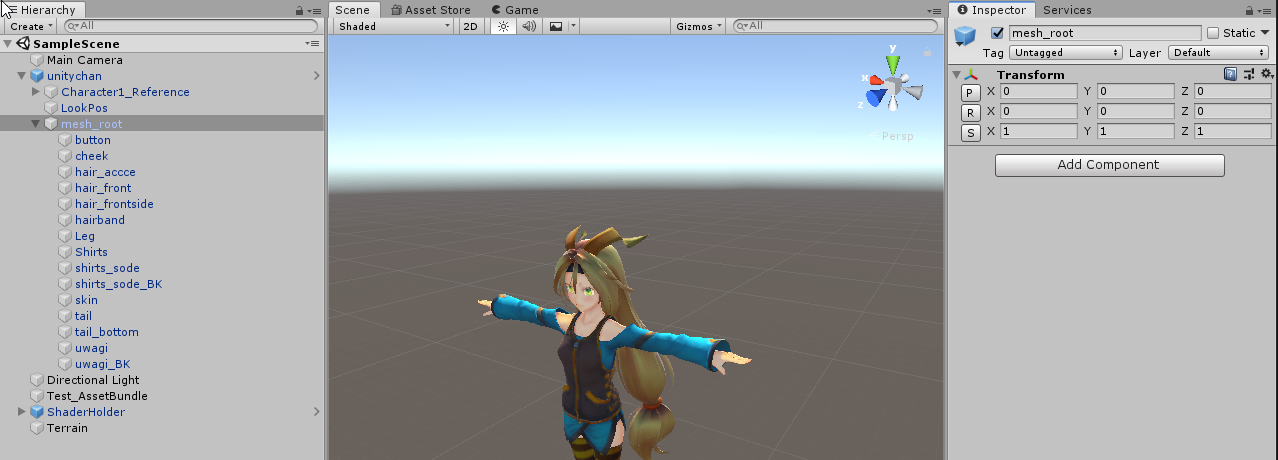
The problem is, Skinned mesh renderers that are used to renderer models that are being transformed by bones need to have their bounding box set up in a way, that during the entire transformation, the model is inside that bounding box. Below is an example of what UnityChan’s bounding box looks like for the part that encapsulates her skin (arm, part of chest and neck).
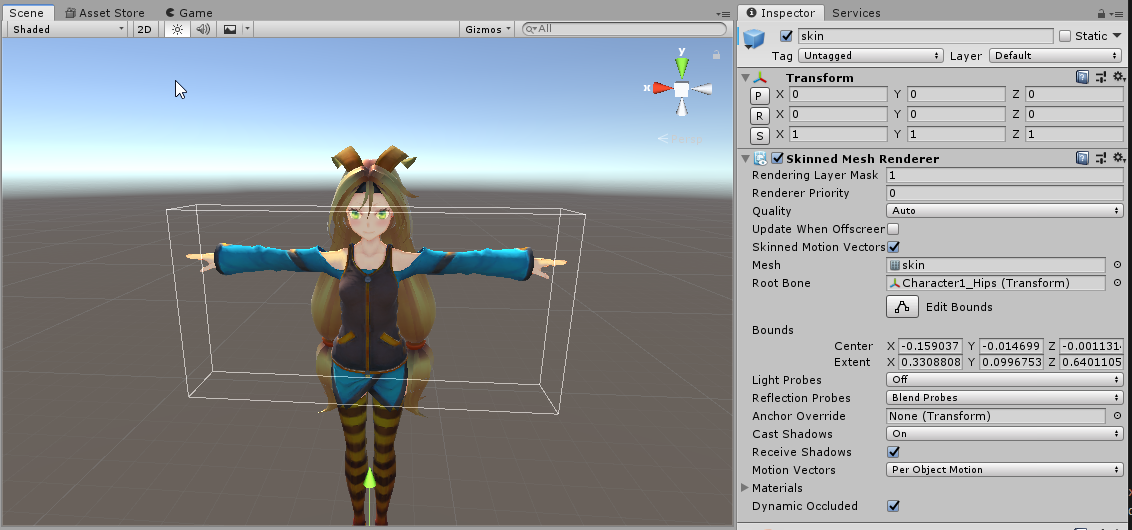
If I were to modify the model’s bounding box in a way that it no longer encapsulates the model’s arms, what would happen the moment, the camera does not see a bounding box, it would stop rendering the model as well. This can be bypassed (although it is a very inefficient way), by toggling “Update when Offscreen” in the Skinned Mesh Renderer component. Instead, I have decided to fix it the correct way, by simplifying calculating the proper bounding box. I knew that one of the ends of the wire is always rendered correctly and having a quick look at its bounding box coordinates, it turned out it has local position 0,0,0 (X, Y, Z). So all that was needed to do is calculate a box that encapsulates the entire mesh from local position 0,0,0 to B. Unity makes operations like this very easy, thanks to its InverseTransformPoint method that automatically handles object orientations and scaling relation in relation to other point in world coordinates.
public void OnEnable()
{
    var skinnedMeshes = GetComponentsInChildren<SkinnedMeshRenderer>(true);
    for (int i = 0; i < skinnedMeshes.Length; i++)
    {
        var newBound = new Bounds();

        var skinnedMesh = skinnedMeshes[i].transform;
        var objectsToEnapsulateParent = skinnedMesh.transform.parent;

        for (int j = 0; j < objectsToEnapsulateParent.childCount; j++)
        {
            var childToEncapsulate = objectsToEnapsulateParent.GetChild(j);
            if (childToEncapsulate == skinnedMesh.transform)
                continue;

            var point = skinnedMesh.transform.InverseTransformPoint(childToEncapsulate.transform.position);
            newBound.Encapsulate(point);
        }

        skinnedMeshes[i].localBounds = newBound;
    }
}
And there we go:

The only problem was that scripts used when rendering wires don’t exactly have anything that could be hooked that is executed once, so instead I opted out to create a new game object if the scene ends up being open world, which has a script that iterates over root objects in the scene and checks if it should be fixed. If so, it attaches a custom component that fixes it (which also gives me a way of knowing it was already fixed and shouldn’t be fixed again). The check happens 1 game object per frame, so as to not introduce performance issues. There is a slight chance, that if a chunk of terrain gets loaded, it will take a few seconds for the wires that the player can see to be fixed.
What I also did (although it wasn’t a bug), is I added - as part of the geometry improvements option - a modification to characters’ LOD size, so they now get rendered at a longer distance, before getting culled (as originally they were culled around 20 metres from the player and that is already on PCs LOD Bias being 2.0, meaning, the % of the screen they have to take is now half of the original LOD group - and that was still way too close!).
Geometry I was not able to fix
Sadly it isn’t the end of issues with geometry rendering with this game. One of the issues that are quite noticeable is tree imposters that are rendered way too close to the camera and whilst the LOD Bias pushes them back, it seems that from a certain distance, regardless of settings imposters will be used. These imposters are just flat, low-resolution textured planes - they are extremely noticeable, they don’t cast any shadows and are something I was hoping to improve but I was not able to.
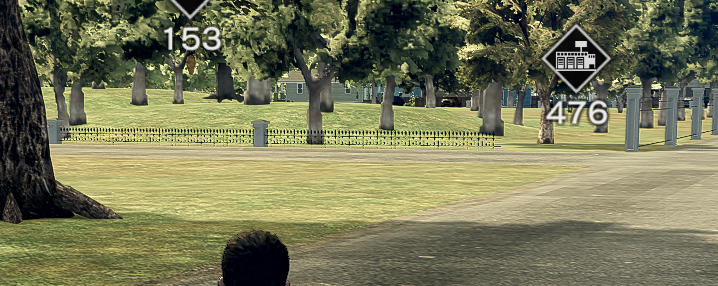
The other element I was hoping to fix and I was able to the way the game renders distance fences. For those, from a certain distance, it seems Graphics.DrawMeshInstanced is used (as that’s what Matrix4x4 arrays would indicate), which allows rendering multiple instances of meshes without having to spawn that mesh in the world and communicate with GPU for each instance that is being drawn. If I am correct, that probably means that the developers had some process developed for level designers that would generate Matrix4x4 arrays for each terrain chunk in places, where fences and walls were placed by level designers. Unfortunately, what seems to have happened, is that there was some bug with calculating their position and now, when they are used (only for distant models), all of their geometry is either somewhere off to the side or stuck in the ground. In the example, above you can see a fence with pillars that are drawn correctly, using a mesh renderer and left of it - what I assume - is a mesh rendered with the DrawMeshInstanced method, which ends up in the ground. Of course, if you approach it, then it gets swapped to a normal mesh renderer and is rendered exactly where it should be, but it is noticeable and it is a bug that developers left.
There are also examples of terrain that is not connected between terrain chunks correctly, which causes gaps in geometry. This could have possibly been fixed in runtime if the developers have used Unity’s terrain. But what this game does instead (despite me referring to terrain) is it uses a mesh renderer. Unity has its terrain system - it had it for a very long time and it does allow you to set up neighbours, to make sure terrain mesh doesn’t fall apart in places where terrains connect with each other. What the developer did instead, is they opted out to use an external component that converts the terrain into a mesh - so not much I can do here.

There is also an issue with road textures. These are low resolution and seem to be unfiltered. I could possibly replace those in runtime, if a good and free replacement were to be found.
Options and lifting the game way past Switch limitations
I will try to keep this section short - god knows, I already have enough of writing this and I am not even done.
One of the issues with this port is that it essentially gives no settings to the player, trying to use a fixed 1920x1080 resolution with a custom PC quality preset. Unity is a flexible engine and it can change settings on the fly. As such a huge part of my hack was exposing those settings to the player and making sure they get applied correctly.
To allow for easy configuration, I used Unity’s GUILayout, which is a part of Unity’s ImGui module. This way, instead of having to design custom canvases and UI with options, I could just create a game object with a proper script and ImGui would automatically do the rest of the job, as I wrote which options to expose.
The first few options exposed were static settings under QualitySettings. These included:
- Vsync count (and an option to set desired frame available if Vsync is disabled under Application.targetFrameRate).
- Texture resolution (which allows for lowering the texture resolution by half on really weak machines)
- Anisotropic settings
- Shadow Resolution
- Shadow Distance
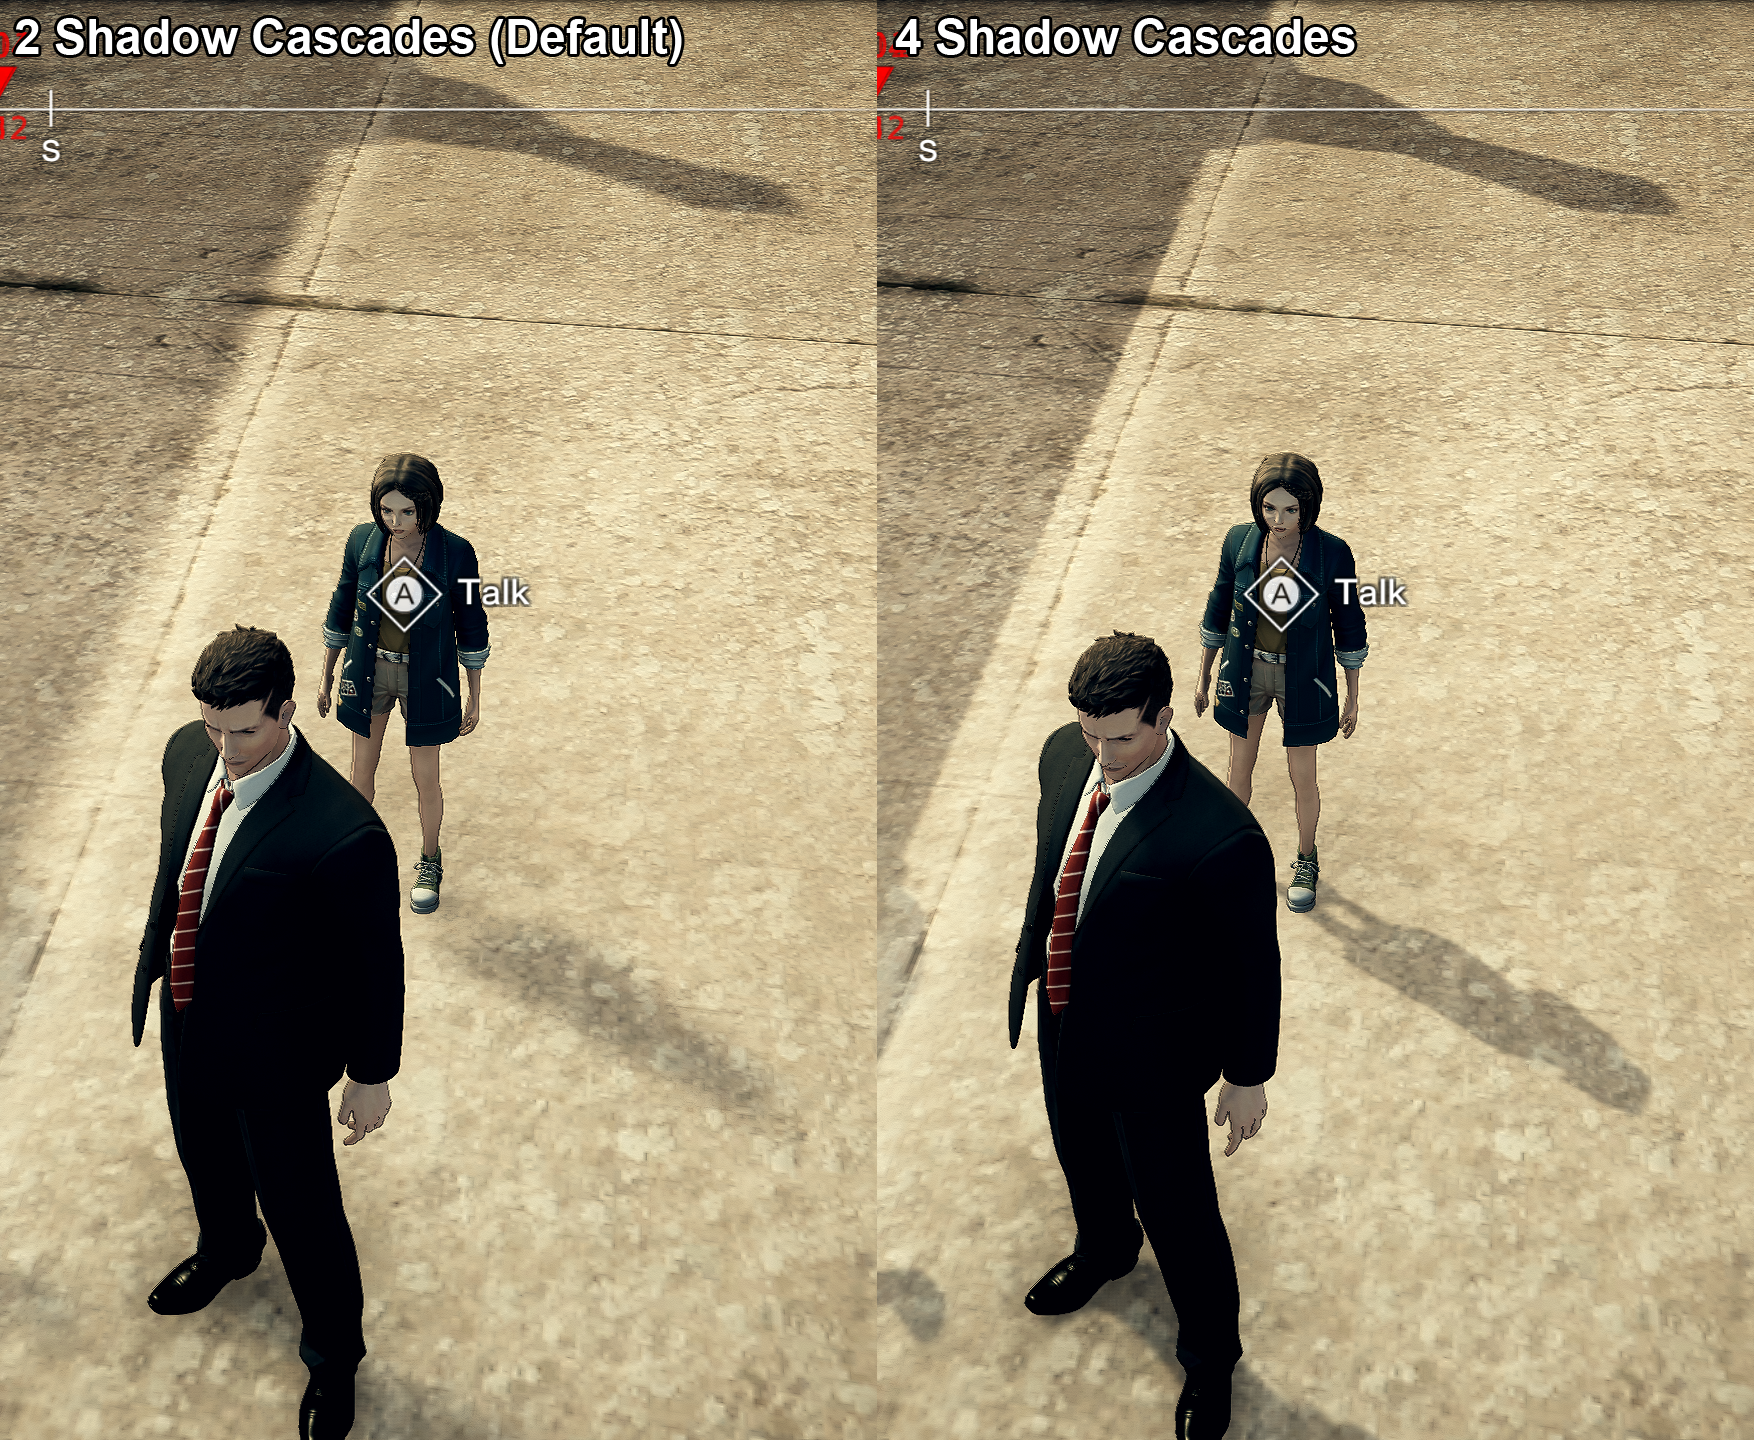
- Shadow Cascades amount and their distances (using 4 instead of 2 makes a massive difference)
- LOD Bias (which pushes the distance at which LODs are getting switched or culled)
After that, the next in line was trying to change the game’s anti-aliasing. This is a bit harder, as anti-aliasing in the deferred rendering path has to be a part of post-process or (very expensive) super sampling (no MSAA allowed) and as such it is set separately for each camera assuming the camera has a PostProcessLayer component attached.
With that, I could easily swap the game’s default FXAA to a way better SMAA or TAA (although the latter causes issues with one of the phantom shaders and as such I recommend not using it, especially if you are a person suffering from epilepsy). Since I already had a reference to a camera, I also extend its far clip plane (although it doesn’t do much due to the distance at which terrain chunks get loaded).
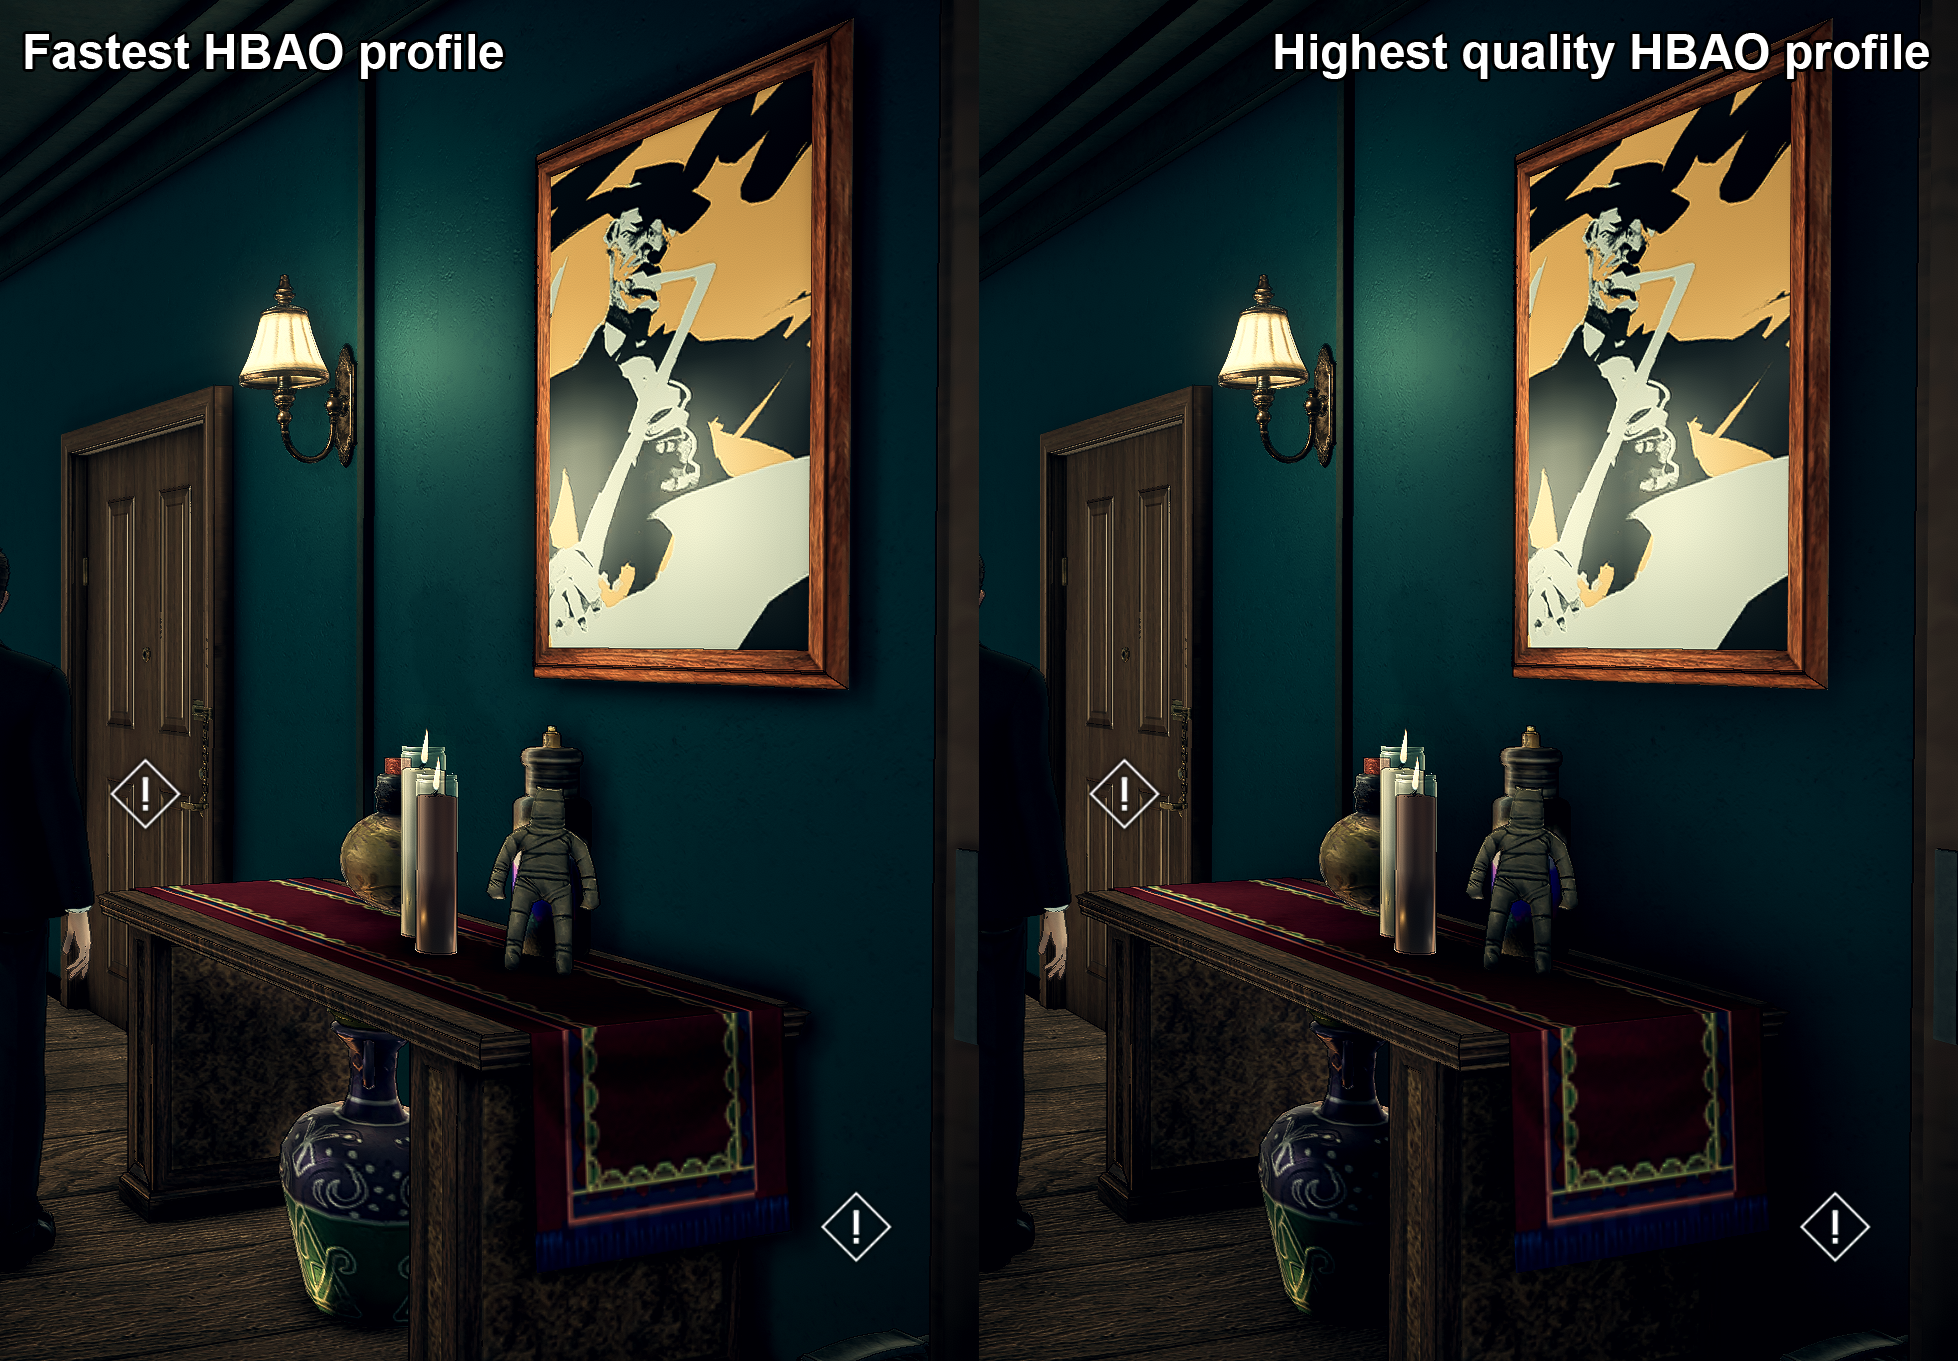
The next step was finding a component used for ambient occlusion, writing code to hook it and allowing the player to change its settings as well. The game uses HBAO (Horizon Based Ambient Occlusion), but it is set by default to use the Fastest profile. Most PCs nowadays, won’t have a problem running it even on the Highest settings. However, it does affect the way it is calculated so I also exposed its intensity multiplier, so users can adjust it.
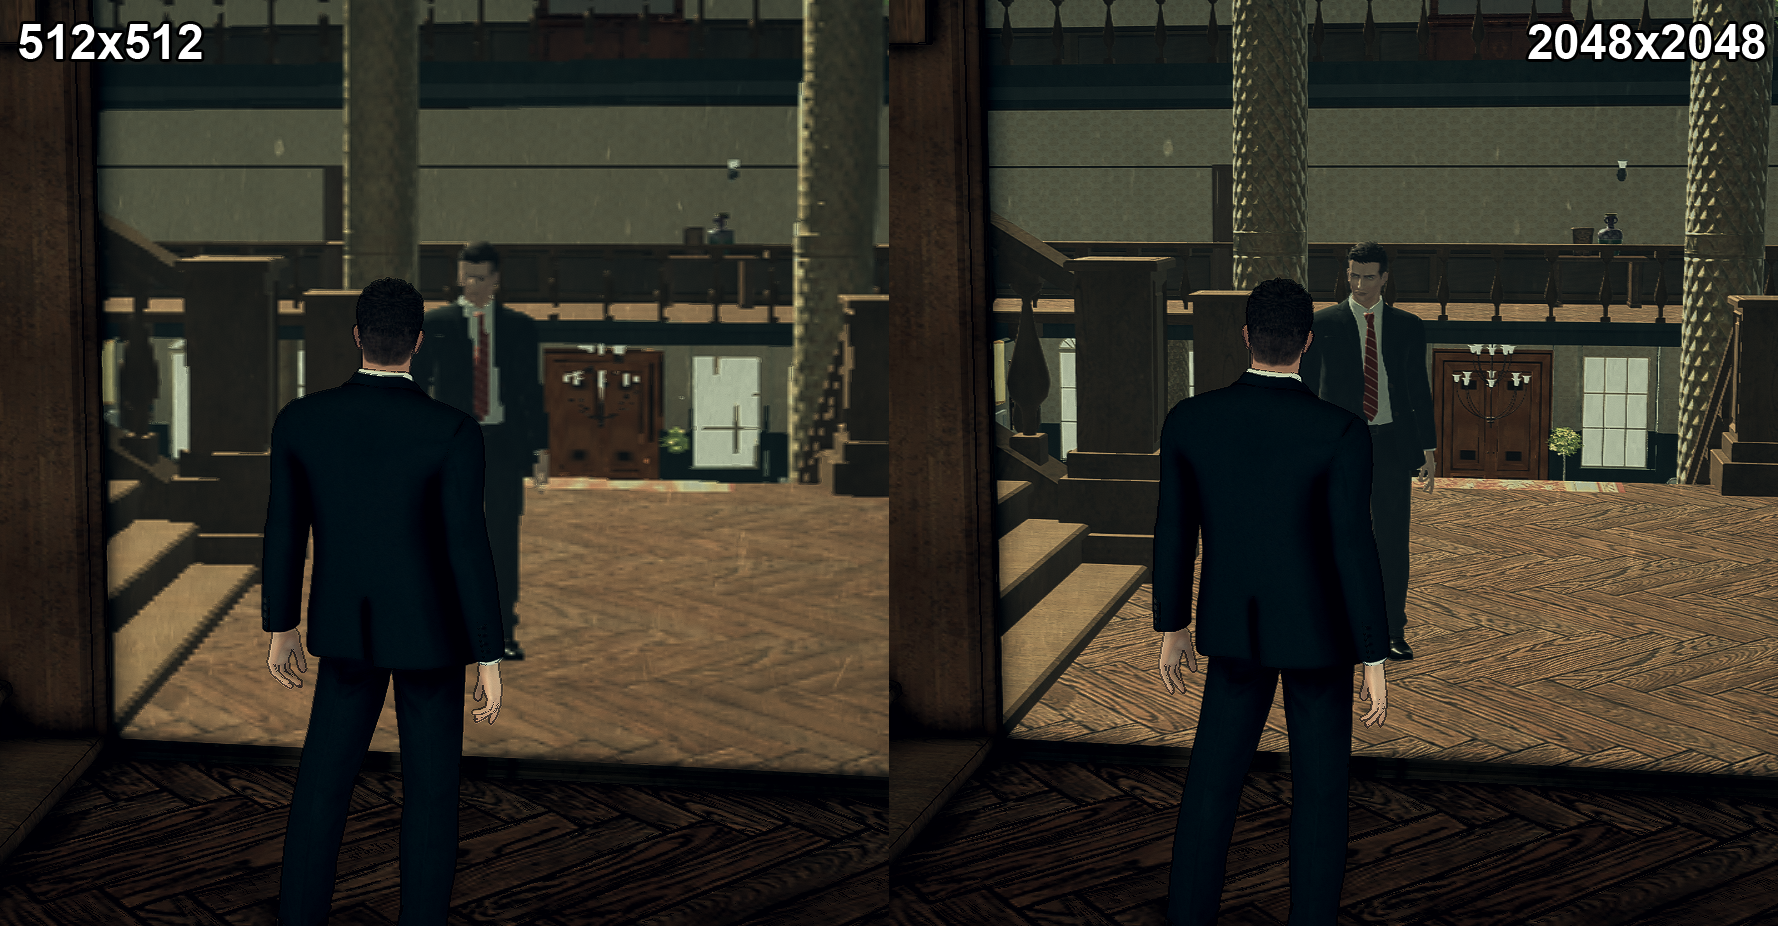
Then I implemented an override for the resolution of render textures used to create planar reflections, as the original resolution is 512x512 and can produce quite pixelated resolutions. The maximum resolution for planar reflections is now 2048x2048.
The next step was finding a way to hook Post Process Volume used by the camera and modify it, based on player needs. With this, I was able to expose an “edge find” filter used, which can now be disabled by the player and screen-space reflections, which can now be enabled and modified by the player to make quite a drastic difference in some scenes.
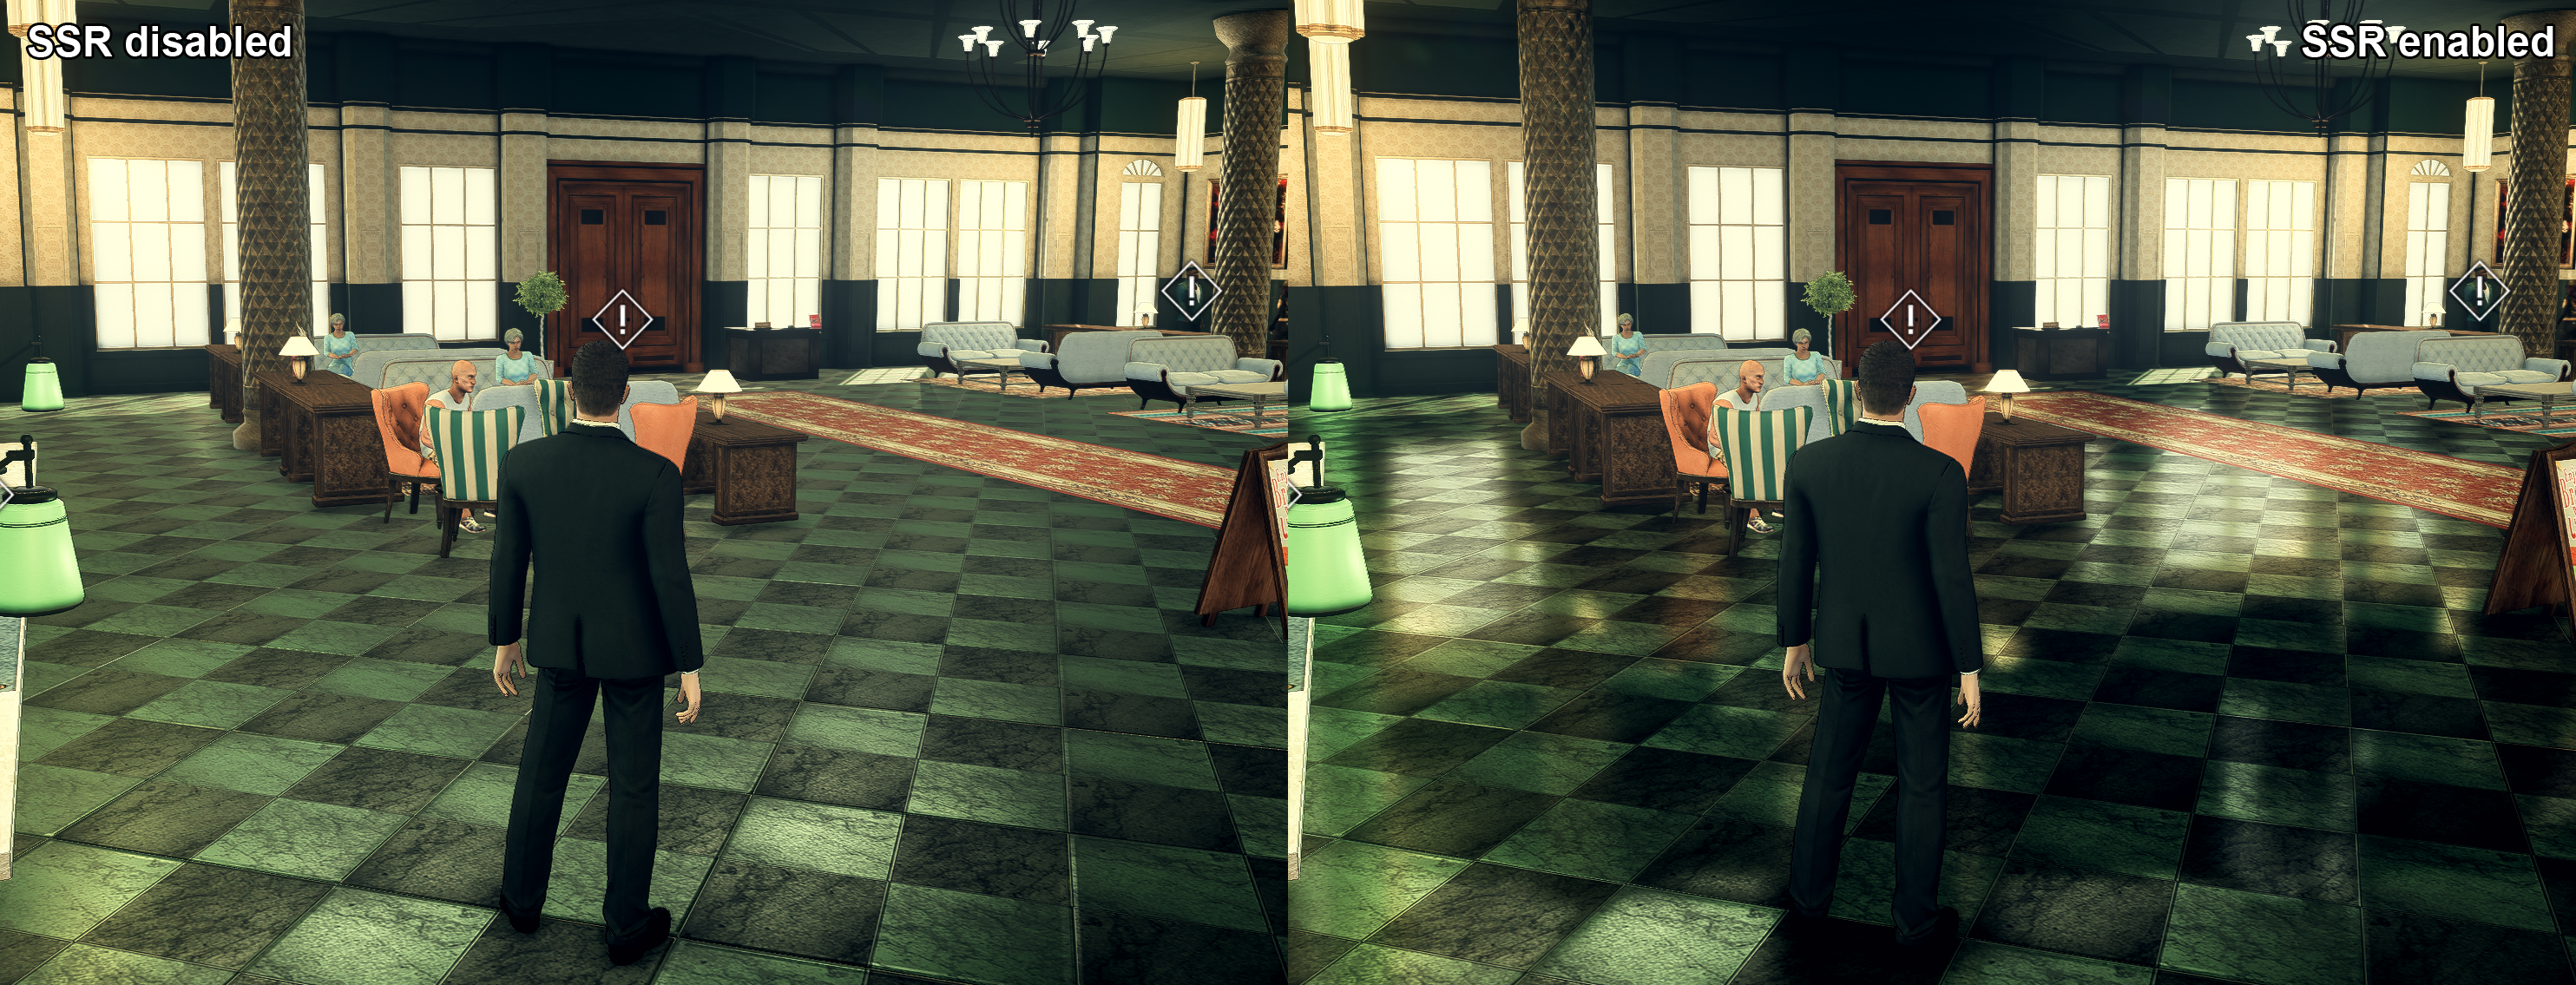
However, in some scenes, it doesn’t make almost any difference, as it is dependent on the materials used. It also won’t introduce any sort of water reflection, as the built-in render pipeline has a limitation, where transparent surfaces can not receive SSR (or any depth-based post-process effect). I also had to write a check related to cold storage and make sure SSR is disabled in that one level, as it was producing massive graphical glitches.
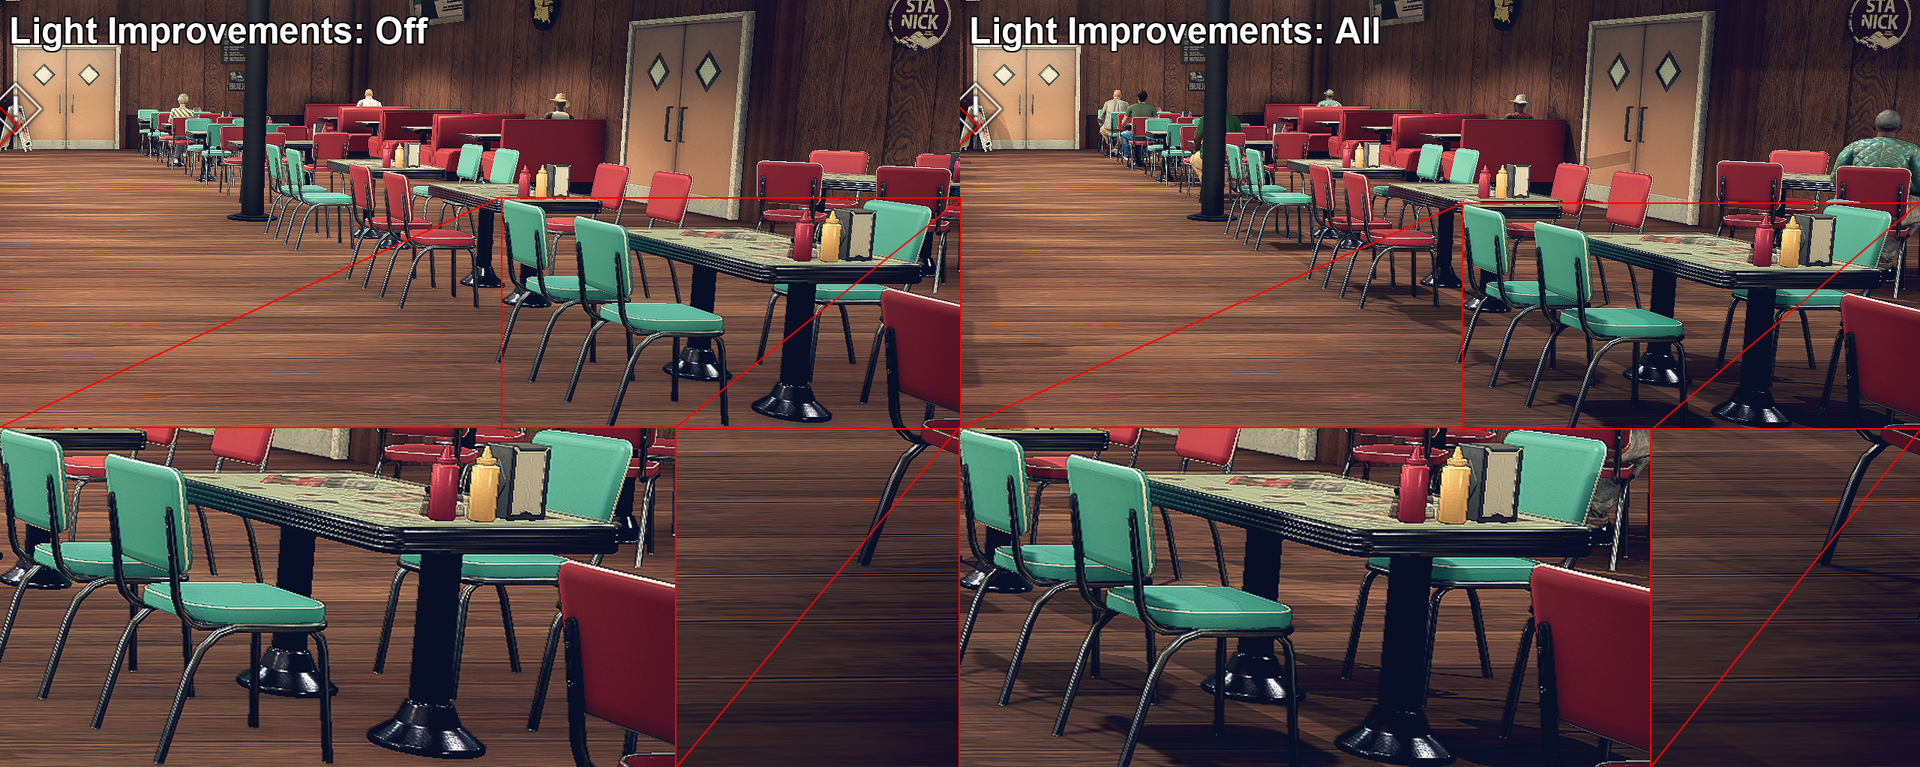
Finally, as the last addition to my experiments, I decided to see what happens if you force shadows. This performance-heavy option, which I named “Light Improvements”. It has 3 presets.
- Disabled - which doesn’t modify any lights and leaves them as it is
- Minor - which adds shadows to York’s flashlight (this one shouldn’t be any problem on PC and should make night and otherworld sections much more interesting)
- All - which adds shadows to all of the light sources used in closed scenes and adds shadows to vehicles during the night. At times, it also modifies some renderers to allow for casting shadows.
As a side note, I was experimenting with enabling shadows of lamps that are used at night, but the performance impact was too drastic and the results were glitchy and didn’t look noticably better, so I decided to leave open-world light as it is.
Closing words
Aside from at least some of the improvements made in my hack, which the original port should have had by default, there are areas which I was unable to improve. One - mentioned earlier being of course issues with tree imposters and fences at the distance, not to mention ground. The area needing the most work - at least graphically in the game - is still the open world.
As mentioned earlier, if the developers have not opted out to convert all terrains to meshes and instead left them, there was a chance, that their mesh could have been improved (in part thanks to Unity alone, increasing mesh density of terrain, when the camera gets closer). Furthermore, some foliage really should have been added. Unity’s terrain can populate terrain with grass models and small bushes automatically when painting the terrain’s splat maps, so I assume it was originally there (at least at some point) and was cut for performance sake when making cuts for Nintendo Switch.
A proper keyboard and mouse support on a PC is pretty much a must, with very few games (like Brothers - A Tale of Two Sons) having any excuse to not provide it. DP2 is certainly not one of those games - we know a good keyboard and mouse support could have been provided and with actual access to a source code - it would probably not take more than 2 weeks of a single person’s work.
If anything, with my hack - I hope I managed to at least prove that Unity is a very flexible engine and drastic shortcomings that you usually see, are either the fault of developers or (more often than not) insufficient resources and bad management.
And yes, I could have probably converted the camera to work in VR - but that would be stupid. See my Art of Rally VR Hack or Raicuparta’s guide.
The current version of my Deadly Premonition 2 hack you can find here.