Posts
-
0451 Vault - Thick as Thieves (2026)
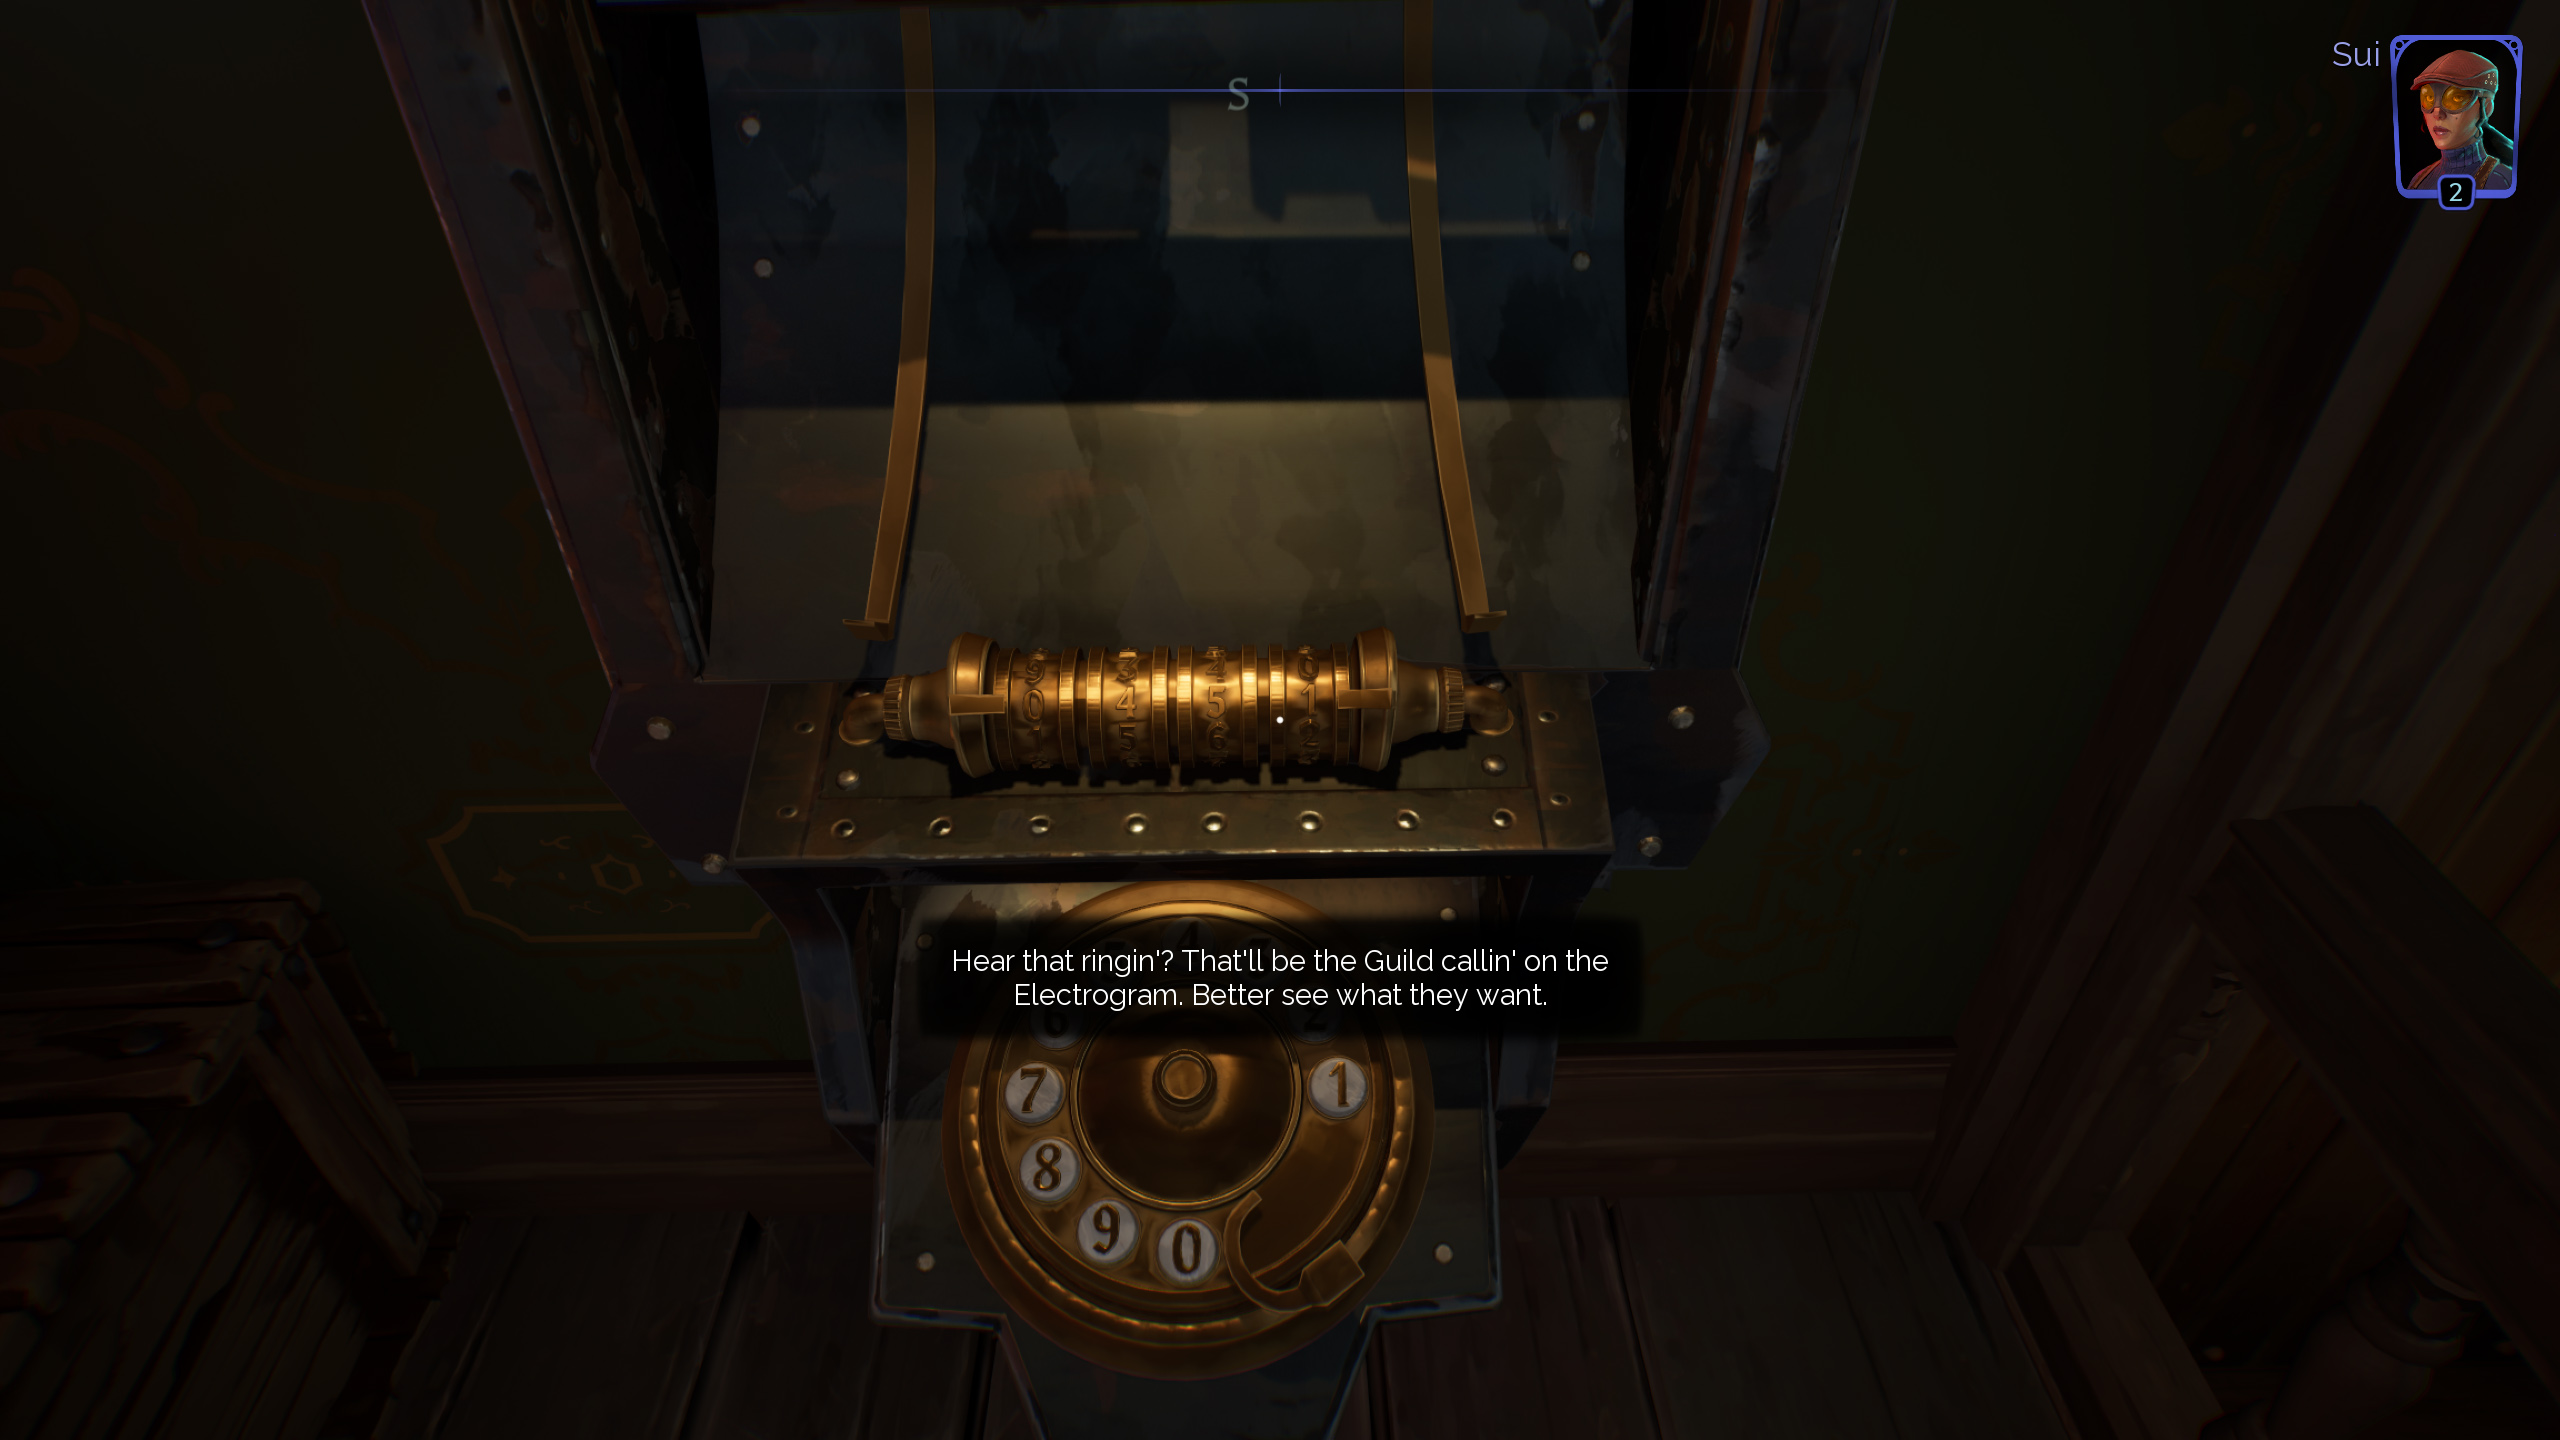
This one is odd. Made by Otherside Entertainement, a studio founded by Paul Neurath, who years earlier also found a legendary Looking Glass Studios, which in turn is responsible for System Shock and spearheaded many early immersive sims. Thick as Thieves is - I guess - an immersive sim that focuses heavily on stealth and some level randomization. It’s a game originally designed to be PvP, later reworked to a smaller scale singleplayer/co-op game, where you can see many of the issues the game had in developement. Don’t get me wrong - it is fun and worth its $5 price tag.
Anyhow, there is a bit of a story - although it’s more like just a context for missions and during the course of the story you are getting contacted by the thieves guild over electrogram. The number? 0451!
-
VTube Texture Compression - why it should be implemented and what are its problems
This blog entry is written in a hope that it can convince Denchi to implement BCn texture compression into VTube Studio. It should hopefully gather all necessity keypoints in a single spot with a few references to external sources to prove the viability of BC7 texture compression in VTube Studio.
The problem BCn helps with
As it stands VTube Studio is a resource hog in terms of VRAM usage. Almost all textures provided to users are in PNG format that then Unity decompresses to ARGBA32. This a problem as Live2D requires many layers for user’s toggles and a decent pixel density, which can result in Live2D models using extreme amounts of VRAM. This is not a given, as talking with some Vtubers I know some of their models are light to a point where they can use as little as 85.33 MB of VRAM for textures, but as the model’s complexity increases, so does their VRAM size - to a point, where their textures can take over 3 GB of VRAM.
With the current DRAM market focusing on quick profits and targeting datacenters over regular users over the last 2 months (as of the moment of writing) we have seen a massive increase in the price of RAM sticks. This is predicted to least for the next few years, with datacenters predicted to consume 70% of world’s RAM production. On a positive side this doesn’t necessary have to affect all VTube Studio users, provided they already have a decent amount of RAM already. The more worrying part are predictions regarding the rise of prices of GPUs, as they are also affected by the DRAM shortages (and companies specializing in DRAM production are prioritizing HBM memory, which results in lower availability of graphics cards with 12GB or 16GB of VRAM, which are preferable cards for VTubers).
Having recently moved to 16 GB graphics card and being constrained with streaming to 8 GB of VRAM for the last 4 years, I believe that that 8 GB is not enough for any streamer - not just Vtubers (The Callisto Protocol or Dead Space Remake have already been running out of VRAM back in 2022, early 2023 even on relatively low details). Vtubers especially will have to deal with this problem, due to how VRAM heavy their models are. As such, I would highly advise implementation of DDS texture format and BC7 in PC version of VTube Studio to drastically reduce the VRAM usage of Live2D models and avoid the issues often present in cheaper DX5/BC3 texture compression or even cheaper DXT1/BC1.
Tradeoffs
Advantages:
- Textures in DDS files load significantly faster than PNG (on average 8.5x faster!) as they are ready to be loaded to RAM and then VRAM straight way.
- BC7 compressed textures take 4x less VRAM.
- BC7 textures do not have observable impact on performance (reportedly they may have slightly higher fetch time, but that is offset with lower bandwidth requirement so they often end up having a lower final cost for rendering)
- Existing PNGs can be converted to DDS with BC7 by users - they do not require involvement of riggers or payed applications.
- (Likely) Already supported by every PC that can run VTube Studio due to compression requiring DX11 (or Vulkan when using DXVK on Linux).
Disadvantages:
- BC7 textures need to be prepared ahead of time due to how complex the process of compressing it is (decompressing is significantly more straightforward).
- They are not mobile friendly (but it’s not too big of a problem, since mobile doesn’t support Vnet)
- Certain models with low pixel density on textures may see some texture degradation (but these are not going to see massive benefits from using BC7 in the first place, anyway).
- BC7 textures stored in DDS take more space on SSD/HDD.
- Support of BC7 on both sides of VNet will require some additional code (likely Gzip or sending original PNG file).
Quality comparison
To prove my point on why BC7 should be implement, I think it’s best to start with visuals. It can’t be just text all the time. The way I set every one of those captures is a maximum available zoom in VTube Studio - not necessary something a user will see, especially with models having variable pixel density, but it’s there to prove a point.
My own model (shoutouts to Tsuno 💚):

2.66GB vs 0.67GB
Akari:
85.33 MB vs 21.33MB
If you look real closely, especially with edges, you can notice a small difference, but tradeoff with BC7 is generally worth it.
Now to show you this isn’t the same image, I have manually increased the size 4x.

2.66GB vs 0.67GB
As you can see with a model of this pixel density, the trade off is very much not noticeable, but we are saving almost 2 GB of VRAM!
DDS vs PNG loading benchmarks
My way of testing it is to do at least 5 different loads of textures of different resolution and calculate an average. I have done it inside of VTube Studio by hooking into the load function. These times are in seconds are rounded to 3 decimal places.
Texture PNG-ARGB32 DDS-BC7 Speed Sui-16k (1) 2.176s 0.213s 10.21x Sui-16k (2) 2.729s 0.327s 8.34x Nepeta-8k 0.419s 0.052s 8.05x Akari-4k 0.128s 0.015s 8.53x This is off topic a bit, but this also got me thinking on how PNG compression (deflate) affects load times in VTube Studio. Results are below:
PNG Texture Compression 9 Compression 6 Compression 1 None Akari-4k 0.244s 0.252s 0.210s 0.175s Now the question that I have in my head - what was the original source PNG compression and what made it load so fast. I guess it’s also worth noting that PNG compression is lossless, but even best case (original texture) loads 8.53x slower with Unity’s LoadImage than from DDS.
Implementation issues
My suggestion for implementation would be to implement support for BC1/BC3 and BC7. This isn’t hard as the hardest part is reading DDS header and then telling Unity which Texture2D object to create based on it - this can be done with my code, but I can’t guarantee it’s 100% flawless. However as far as I understand there are 2 things that need to be considered:
- Mobile compatibility
- VNet support
Mobile compatibility
Here with my limited time I can only offer suggestions.
- Option 1 would be to do it in a similar way to my VTS-Memory-Compression hook, where VTube Studio checks whatever PNG file exists and once it is found, check whatever DDS file is present - if the latter is found, the latter is loaded, if not, PNG (or technically originally defined texture in json file) is loaded. With this approach, when sending a model to mobile application we can be sure that the file that the phone can handle is there (although that still doesn’t prohibit sending a resolution that mobile phones can not handle - but this is an issue present currently as well). Another good thing about this approach is that we can be sure the user has access to original, lossless texture - BC1/BC3/BC7 are lossy after all and you can never fully trust riggers to provide the end user lossless texture, if they are given a chance not to do it.
- Option 2 and this is something to possibly explore, since I haven’t been able to verify it - it’s possible that despite BC1/BC3/BC7 not being supported on mobile, they will get automatically decompressed by Unity anyway using software, as Unity documentation implies it. But I personally think the first option is safer.
VNet
Since VNet as far as I know isn’t available on Mobile, this leads to a safe assumption that any hardware running VTube Studio is capable nowadays of handling BC7 (and simpler) compression schemes.
However, since BCn compressed textures are generally bigger than PNGs, this posses an issue when sending them to external users. My suggestion for this would be a use of Gzip. To keep things performant, I would say that when joining VNet, user’s textures should get compressed and stored in a temporary directory - this is due to how long a Gzip compression takes.
In my test (inside of Unity, so it might be faster in release) compression of 341MB DDS file took 3s, which is quite a significant amount of time. Of course, this an extreme case as the texture is 16k! Smaller textures were below 1s, thankfully!
PNG Texture Source Source with
Compression 9DDS Gzip DDS Sui-16k (1) 101.0MB 41.3MB 341MB 84.2 MB Sui-16k (2) 54.5MB 22.7MB 341MB 42.9 MB Nepeta-8k 8.11MB 5.13MB 85.3MB 5.99MB Akari-4k 7.03MB 5.24MB 21.3MB 5.06MB So worst case scenario, Gzipped texture is always smaller than all source textures I had. Bad news is that using PNG Compression on Level 9 results almost always in smaller files than Gzipped DDS, anyway.
Conclusion
With how the things are nowadays, I believe DDS and BC7 offers significant advantages for VTubers who are limited to a single PC setup (which is vast majority of them) at almost no cost for the user (as long as the quality drop is not noticeable). Having used my own hook for VTube Studio I personally see it as a massive advantage for the user, which drastically reduces VRAM requirement of complex models, which then allows that VRAM space to be utilized by games instead, not to mention speeds up loadings of models!
Of course ultimately the decision on whatever to implement it remains to Denchi. But with hardware prices nowadays and how hard it is to get a good deal on a new graphics card that has 16 GB of VRAM, this could help many VTubers that are limited to 8 GB or 12 GB graphics cards play more modern games or play games with higher amount of details, no longer being handicapped so much by their models using excessive amount of VRAM.
Sources and references
- https://github.com/SuiMachine/VTS-Memory-Compression
- https://www.reedbeta.com/blog/understanding-bcn-texture-compression-formats/
- https://www.connburanicz.com/block-compression-bc1-bc7
- https://www.gamedev.net/forums/topic/719663-are-there-any-hidden-costs-of-using-bc7-over-rgba32/
- https://learn.microsoft.com/en-US/windows/win32/direct3ddds/dx-graphics-dds
-
OBS Custom transition with a Shader
This is something I wrote for my own model debut, as I knew I won’t be able to afford a custom stinger transition at the time of the debut. Plus I wanted the transition to be a bit out of ordinary - stinger transitions are great, but they do not allow you to modify pixel positions from scene A/B - only fade between A/B. Shaders don’t have that limitation. This initially started with me planning out everythin in Unity’s shader graph to have a better view on each stage of the transition and once I had a general concept, I started translating shader graph to shader language used OBS Shader component. The original transition was suppose to be using sampling from scene A and B, logo and a something similar to a normal texture to produce a much more interesting and complex transition. However mid-project I have run into an issue that seems to be related to a limitation of using only 3 textures that can be sampled. With 4, the results would just break with OBS Shader plugin not providing any error message.
As a workaround, I was planning on looking up how to create hexagons using pixel shaders, however due to the debut being set in stone, I have eventually decided to just simplify it to a simple wave pattern (which I am not exactly happy with).
 If you want, you can always follow me on Twitch or YouTube.
While I won’t provide you with a logo, you are free to use this code with your own logo if you find it interesting:
// Glass-shield transition
// written by SuiMachine / Sui_VT.
// You are free to modify it as you please.
// Credit is not required but appriciated.
//
// There may be a few sections in here that seem like they are overcomplicated but may be intentional
// For example I initially wrote a shader so that it built UVs for a logo and sampleed image_a or image_b
// but then run into an issue where sampling background with normal coorinates would result
// in old data being overriden, so I had to rewrite it in a way where image_a or image_b are sampled only once!

uniform texture2d image_a;
uniform texture2d image_b;
uniform float transition_time = 0.5;
uniform float Aspect_ratio = 1.77777777778;
uniform bool convert_linear = true;

uniform texture2d LogoTexture = "SuiLogo.png";
uniform float2 LogoColorDistortionXY = { 0.2, 0.05 }; //Made it look cooler, though
uniform float LogoColorDistortion_Strength = 0.51;

uniform float3 Logo_Shine_Line = {1, 1, 1};

uniform float Logo_scale = 0;
uniform float2 Logo_positionXY = {0, 0};

uniform float Start_Logo_scale = 10;
uniform float2 Start_Logo_positionXY = {0, 0};

uniform float Distortion_wave_strength = 1;

uniform float phase2Start = 1;
uniform float phase3Start = 1;

float2 GetCenteredUV(float2 uvIn) { return uvIn - float2(0.5, 0.5); }

float2 GetCenteredUVScaled(float2 uvIn, float X_scale)
{
  float2 result = uvIn - float2(0.5, 0.5);
  return result * float2(X_scale, 1.0);
}

float2 RestoreNormalUVCoordinate(float2 uvIn) { return uvIn + float2(0.5, 0.5); }
float2 MirrorUV(float2 uv) { return 1.0 - abs(frac(uv * 0.5) * 2.0 - 1.0); }

//Based on https://realtimevfx.com/t/collection-of-useful-curve-shaping-functions/3704
float SmoothSlowdownCurve(float x) { return 1.0 - pow(abs(x - 1.0), 3.5); }

uniform float4 background_color = {0.0, 0.0, 0.0, 1.0};

void GetTransformedLogo(float2 screenUV, float2 uv, float distortionStrength, out float3 logoPixel, out float2 distortedUV, out float logoAlpha)
{
  float4 sampledLogo = LogoTexture.Sample(textureSampler, uv);
  logoAlpha = sampledLogo.a;
  logoPixel = sampledLogo.rgb;

  float2 logoUVDistortion = sampledLogo.rg - LogoColorDistortionXY; //This may need to be modified for blue-ish logos
  logoUVDistortion = logoUVDistortion * distortionStrength;

  float2 distoredSceneAUV = screenUV + logoUVDistortion;
  distortedUV = MirrorUV(distoredSceneAUV);
}

float GetGradient(in float2 screenUV, float percent)
{
    //Create diagnal gradient
    float gradientX = screenUV.x * Aspect_ratio;
    float gradientY = screenUV.y;

    gradientX = gradientX - 0.88;
    gradientY = gradientY - 0.5;

    float fullGradient = gradientX + gradientY;

    float tVal = lerp(1.5, -2.5, percent); //this might need to be adjusted on wider aspect ratios :-/
    fullGradient = fullGradient - tVal;
    fullGradient *= 10; //sharper edge
    return fullGradient;
}

void GetWaveyParttern(in float2 centeredScaledUV, in float2 centeredUV, float percent,  out float ramp,  out float visibility)
{
  float len = length(centeredScaledUV);
  float tValue = lerp(-2, 2, percent);
  visibility = len + tValue;

  float secondaryValue = 1 - visibility;
  secondaryValue = secondaryValue * secondaryValue;
  secondaryValue = 1 - secondaryValue;
  ramp = secondaryValue;

  visibility = clamp(visibility, 0, 1);
}

float4 mainImage(VertData v_in) : TARGET
{
  float2 squareImageScaledUVs = GetCenteredUVScaled(v_in.uv, Aspect_ratio);
  float2 recenteredUVs = GetCenteredUV(v_in.uv);

  if(transition_time < phase2Start)
  {
    float tempT = transition_time / phase2Start;

    //Transform start and UVs
    float2 logoPosition = squareImageScaledUVs / float2(Logo_scale, Logo_scale);
    logoPosition += float2(Logo_positionXY.x * -1.0, Logo_positionXY.y);

    float2 logoPositionStart = squareImageScaledUVs / float2(Start_Logo_scale, Start_Logo_scale);
    logoPositionStart += float2(Start_Logo_positionXY.x * -1.0, Start_Logo_positionXY.y);

    //Use linear interpoation over time and sample pixel
    float2 finalPosition = lerp(RestoreNormalUVCoordinate(logoPositionStart), RestoreNormalUVCoordinate(logoPosition), SmoothSlowdownCurve(tempT));

    float3 logoPixel;
    float2 distortedLogoPixel;
    float logoAlpha;
    GetTransformedLogo(v_in.uv, finalPosition, LogoColorDistortion_Strength, logoPixel, distortedLogoPixel, logoAlpha);

    //Mix with background
    float2 combinedUV = lerp(v_in.uv, distortedLogoPixel, logoAlpha);
    float3 result = image_a.Sample(textureSampler, combinedUV).rgb;

    if(convert_linear)
      result = srgb_nonlinear_to_linear(result);
    return float4(result, 1.0);
  }
  else if(transition_time < phase3Start)
  {
    float tempT = (transition_time - phase2Start) / (phase3Start - phase2Start);
    //Transform start and UVs
    float2 logoPosition = squareImageScaledUVs / float2(Logo_scale, Logo_scale);
    logoPosition += float2(Logo_positionXY.x * -1.0, Logo_positionXY.y);
    logoPosition = RestoreNormalUVCoordinate(logoPosition);

    float sceneVisiblity;
    float rampVisibility;
    GetWaveyParttern(squareImageScaledUVs, recenteredUVs, tempT, rampVisibility, sceneVisiblity);

    float2 distortedUV2 = recenteredUVs *  (1- clamp(rampVisibility, 0, 1));
    distortedUV2 = distortedUV2 + 0.5;
    distortedUV2 = v_in.uv + distortedUV2;
    distortedUV2 = distortedUV2 * 0.5;

    //Mix with background
    float3 logoPixel;
    float2 logoDistoredUV;
    float logoAlpha;
    GetTransformedLogo(distortedUV2, logoPosition, LogoColorDistortion_Strength, logoPixel, logoDistoredUV, logoAlpha);

    float2 sampledBackgroundUV = lerp(v_in.uv, distortedUV2, rampVisibility);
    sampledBackgroundUV = lerp(sampledBackgroundUV, logoDistoredUV, logoAlpha);
    float3 distoredBackgroundA = image_a.Sample(textureSampler, sampledBackgroundUV).rgb;
    float3 distoredBackgroundB = image_b.Sample(textureSampler, sampledBackgroundUV).rgb;

    float gradientValue = GetGradient(v_in.uv, tempT);
    float clampedGadient = clamp(gradientValue, 0, 1);
    float appearLine = clamp(1 - (gradientValue * gradientValue), 0, 1);
    appearLine = appearLine * logoAlpha;

    float3 blendedBackgrounds = lerp(distoredBackgroundA, distoredBackgroundB, sceneVisiblity);
    float3 blendedWithLogo = lerp(blendedBackgrounds, logoPixel, logoAlpha);
    float3 result = lerp(blendedBackgrounds, blendedWithLogo, clampedGadient);
    result += appearLine * Logo_Shine_Line;

    if(convert_linear)
      result = srgb_nonlinear_to_linear(result);
    return float4(result, 1.0);
  }
  else
  {
    float tempT = (transition_time - phase3Start) / (1 - phase3Start);

    float tempSub1 = clamp(tempT * 2, 0, 1);
    float tempSub2 = clamp((tempT * 2) - 1, 0, 1);

    float2 finalPosition = squareImageScaledUVs / float2(Logo_scale, Logo_scale);
    finalPosition += float2(Logo_positionXY.x * -1.0, Logo_positionXY.y);

    float3 logoPixel;
    float2 distortedLogoPixel;
    float logoAlpha;
    GetTransformedLogo(v_in.uv, RestoreNormalUVCoordinate(finalPosition), LogoColorDistortion_Strength, logoPixel, distortedLogoPixel, logoAlpha);

    float2 combinedUV = lerp(v_in.uv, distortedLogoPixel, logoAlpha);
    float3 distortedBackground = image_b.Sample(textureSampler, combinedUV);
    float3 blendedWithLogo = lerp(distortedBackground, logoPixel, logoAlpha);
    float3 clearBackground = image_b.Sample(textureSampler, v_in.uv);

    float gradientValue = GetGradient(v_in.uv, tempSub1);
    float clampedGadient = clamp(gradientValue, 0, 1);
    float appearLine = clamp(1 - (gradientValue * gradientValue), 0, 1);

    float3 result = lerp(blendedWithLogo, clearBackground, clampedGadient);
    result = lerp(result, distortedBackground, appearLine);

    if(convert_linear)
      result = srgb_nonlinear_to_linear(result);
    return float4(result, 1.0);
  }
}
-
0451 Vault - No, I'm not a Human (2025)
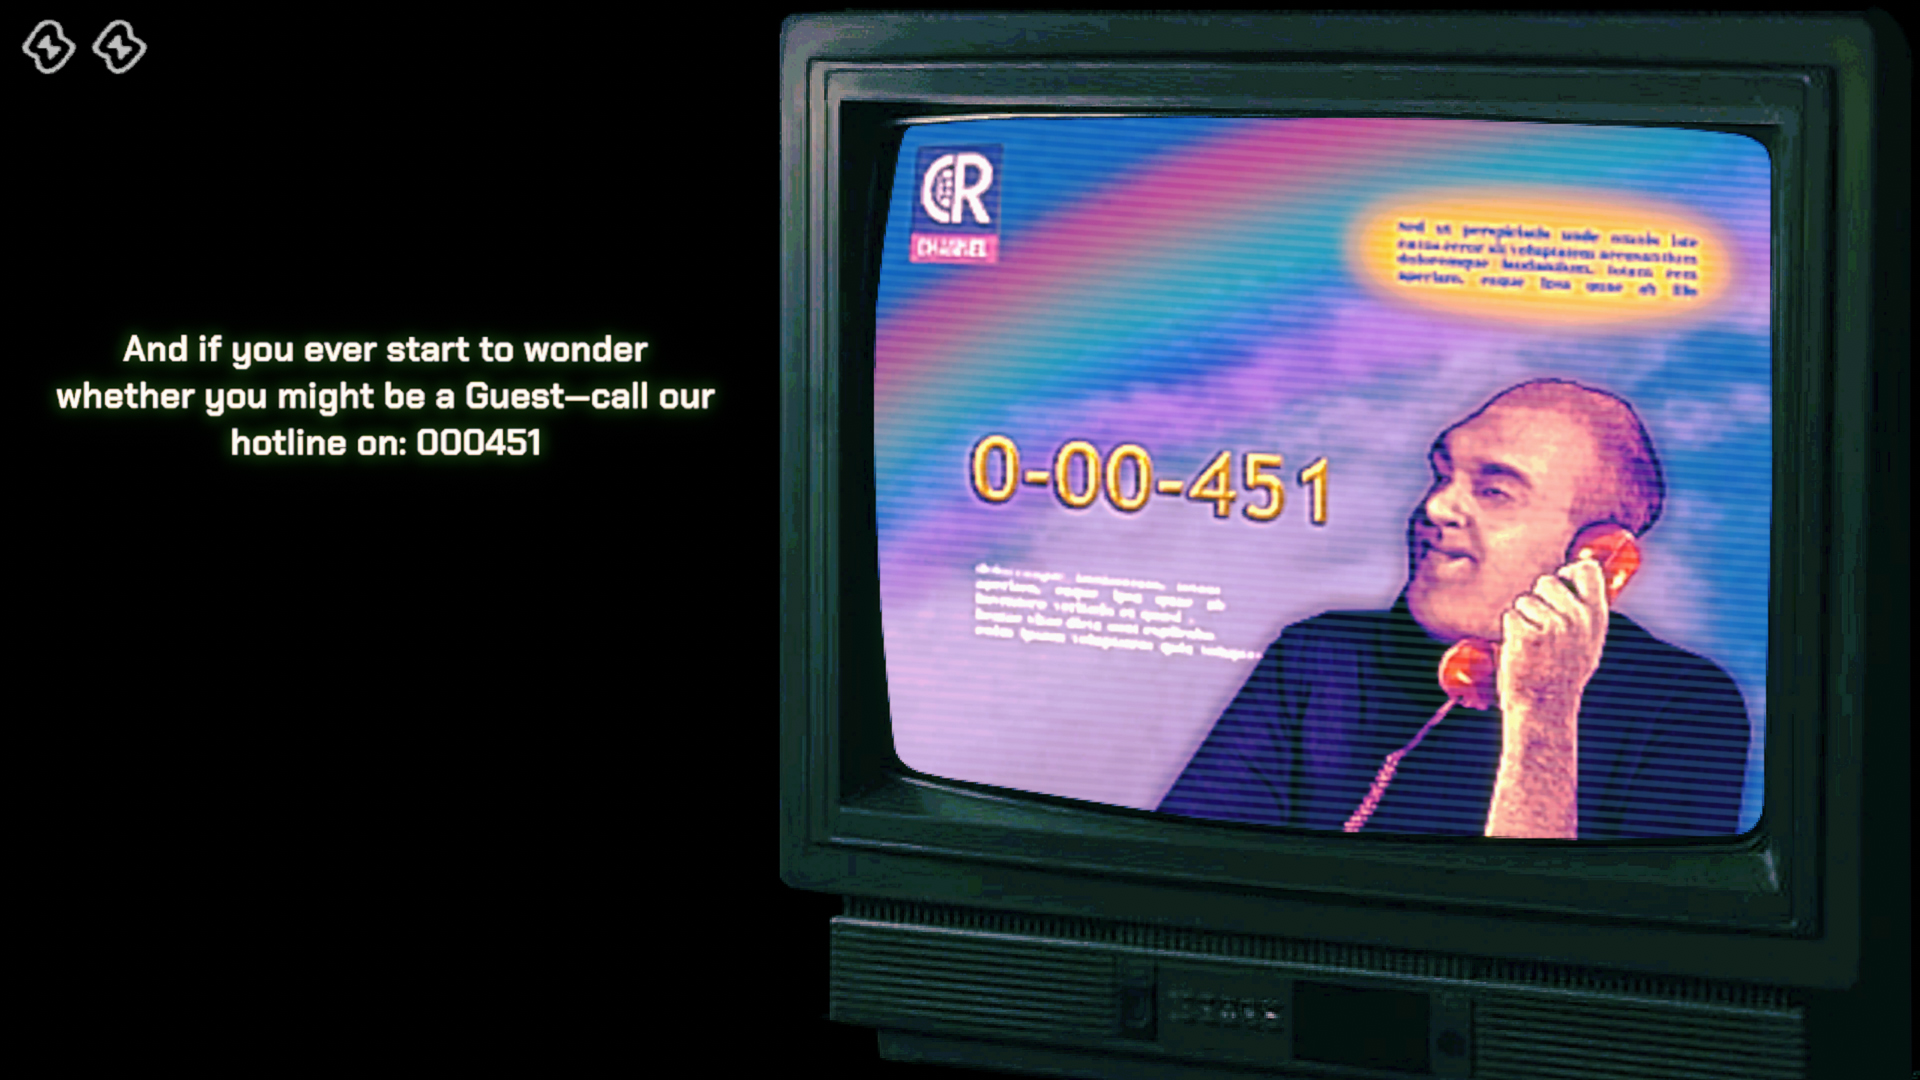
I guess one could describe ‘‘No, I’m not a Human’’ as kind of advanced choose your own adventure game with a bit of randomization. Concept is simple - some monsters have appeared that will come into your house and kill you if you are alone - so you need to let someone in, but who do you let in? During that FEMA is quickly formed to help to control the crisis and study Visitors offering possibly cluses on how to identify them. A phone number? 0-00-451!
-
0451 Vault - Peripeteia (2025)

Peripeteia, currently in Early Access, is a Polish indie immersive sim inspired by Deus Ex and games from Looking Glass Studios. Unsurprisingly, during the 2nd mission, in which we are asked to eliminate Jakub Franciszek, we may eventually come across a PC that requires us to enter a login and password. While I won’t spoil the login, the password turns out to be 0451.
-
0451 Vault - Home Safety Hotline - Seasonal Worker (2024)
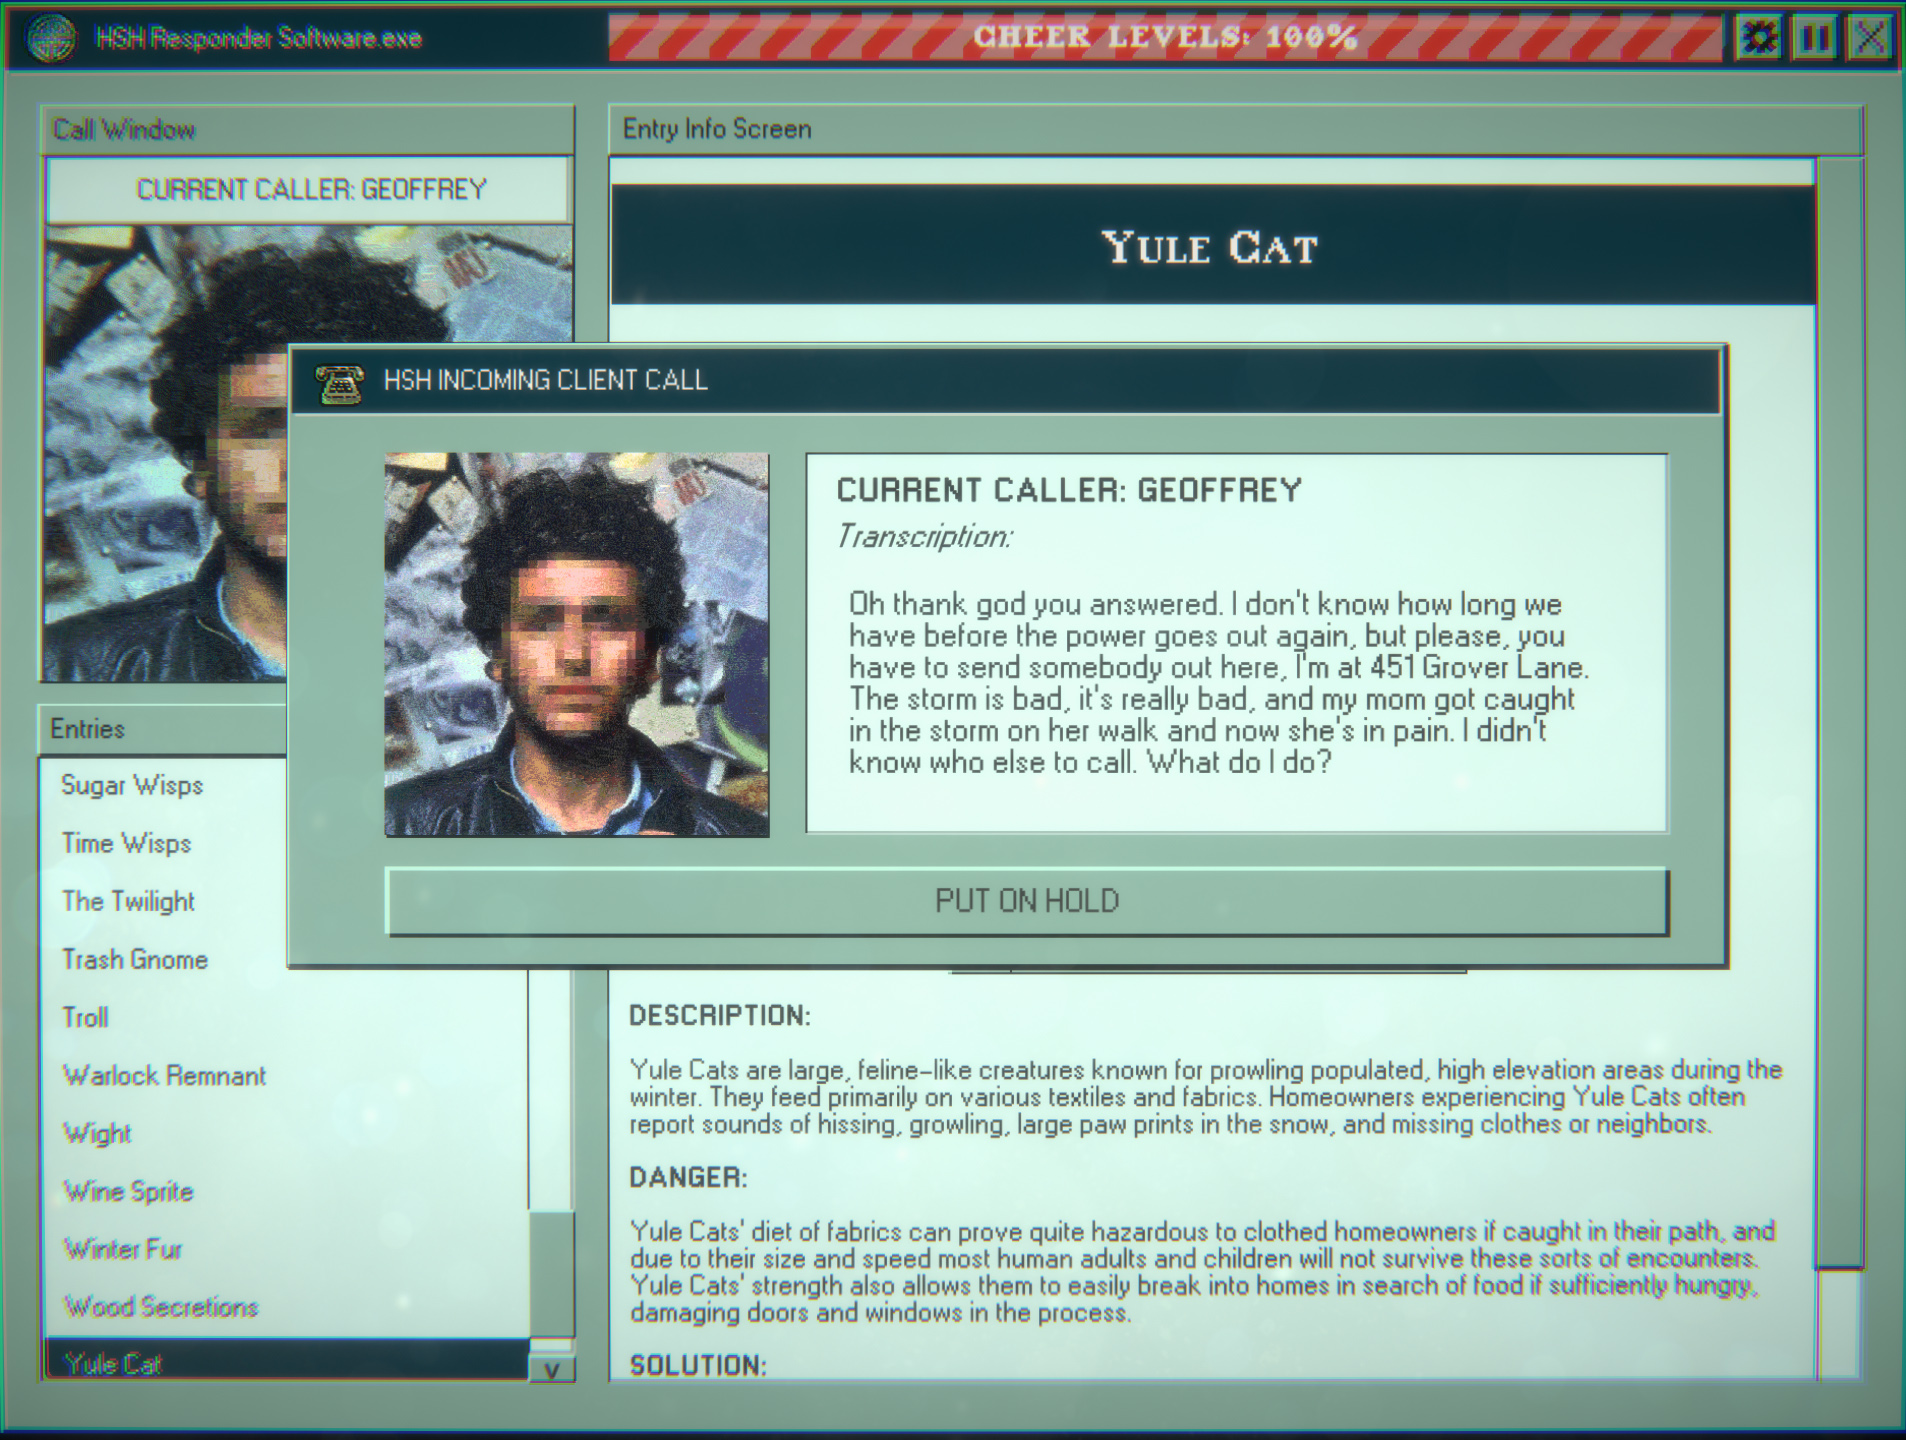
A DLC to Home Safety Hotline has a little 451 easter egg hidden during the last day. When called by Geoffrey, he’ll tell you his location - 451 Grover Lane. OK then.
-
0451 Vault - Silent Hill 2 (2024)
The Silent Hill 2 remake had a pretty high bar to clear. The original 2001 game is a cult classic, filled with complex narrative elements and not-so-obvious symbolism. The remake not only had to attract a new generation of fans, but also satisfy the vast majority of old ones with new content. Did it succeed? In my opinion, yes.
One of the things it added, however, was a little digital safe puzzle at the motel, where one of the notes hides a well-known combination - 0451.
-
0451 Vault - Still Wakes the Deep (2024)
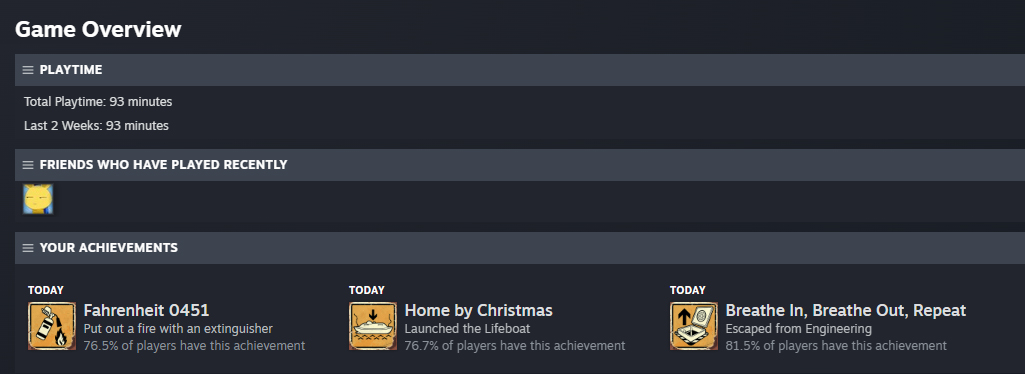
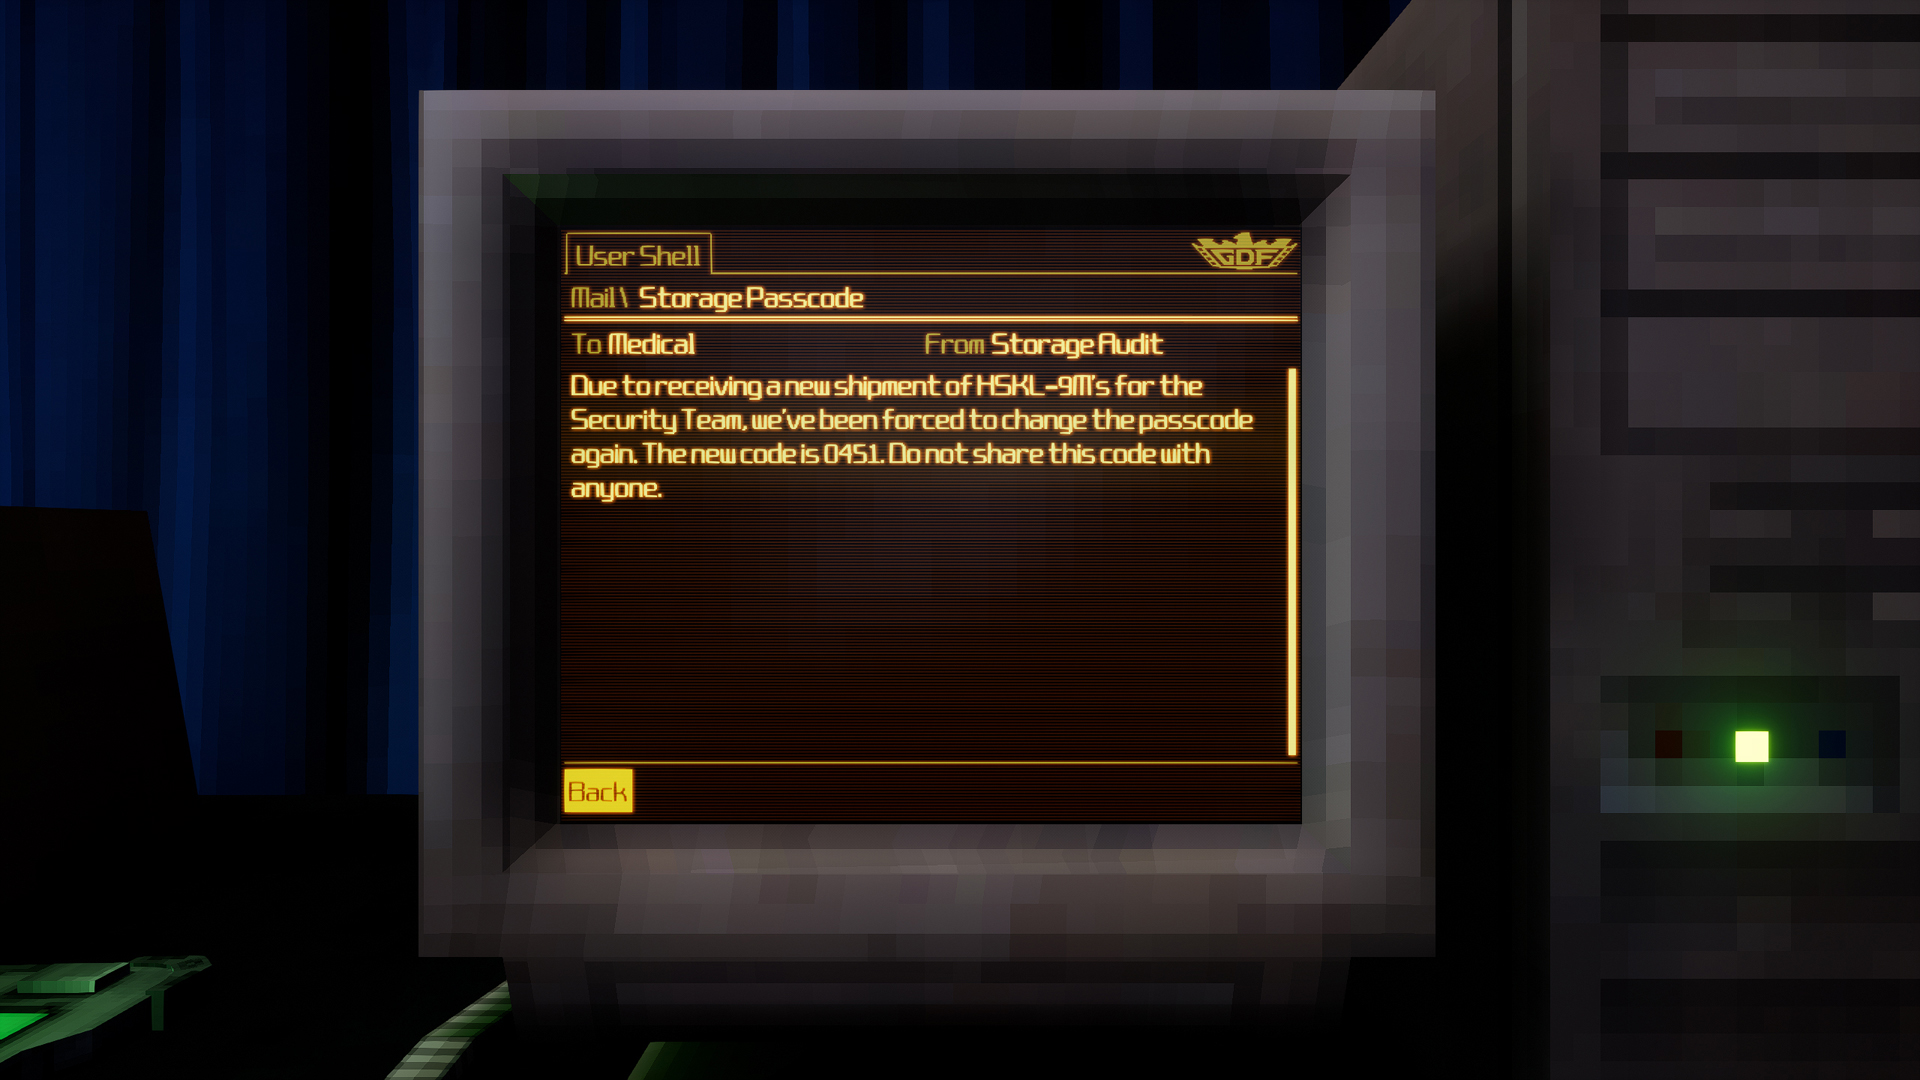
Still Wakes the Deep is a horror game developed by The Chinese Room. It’s far from being an immersive sim or even something with hub-like design similar to Amnesia - just a linear game. In the first hour of so of the game, you end up picking a fire-extinguisher and putting out some fires, which gets you an achievement “Fahrenheit 0451” - which woud be probably accidental if it wasn’t for the 0 at the beginning.
-
0451 Vault - Phantom Fury (2024)
Phantom Fury is a shooter that advertises itself as inspired Half-Life and SiN inspire and while to some extend this is true, it has all of the faults that the other titles of Slipgate Ironworks have. And it features that easter egg - because they implemented keypads ¯\(ツ)/¯
-
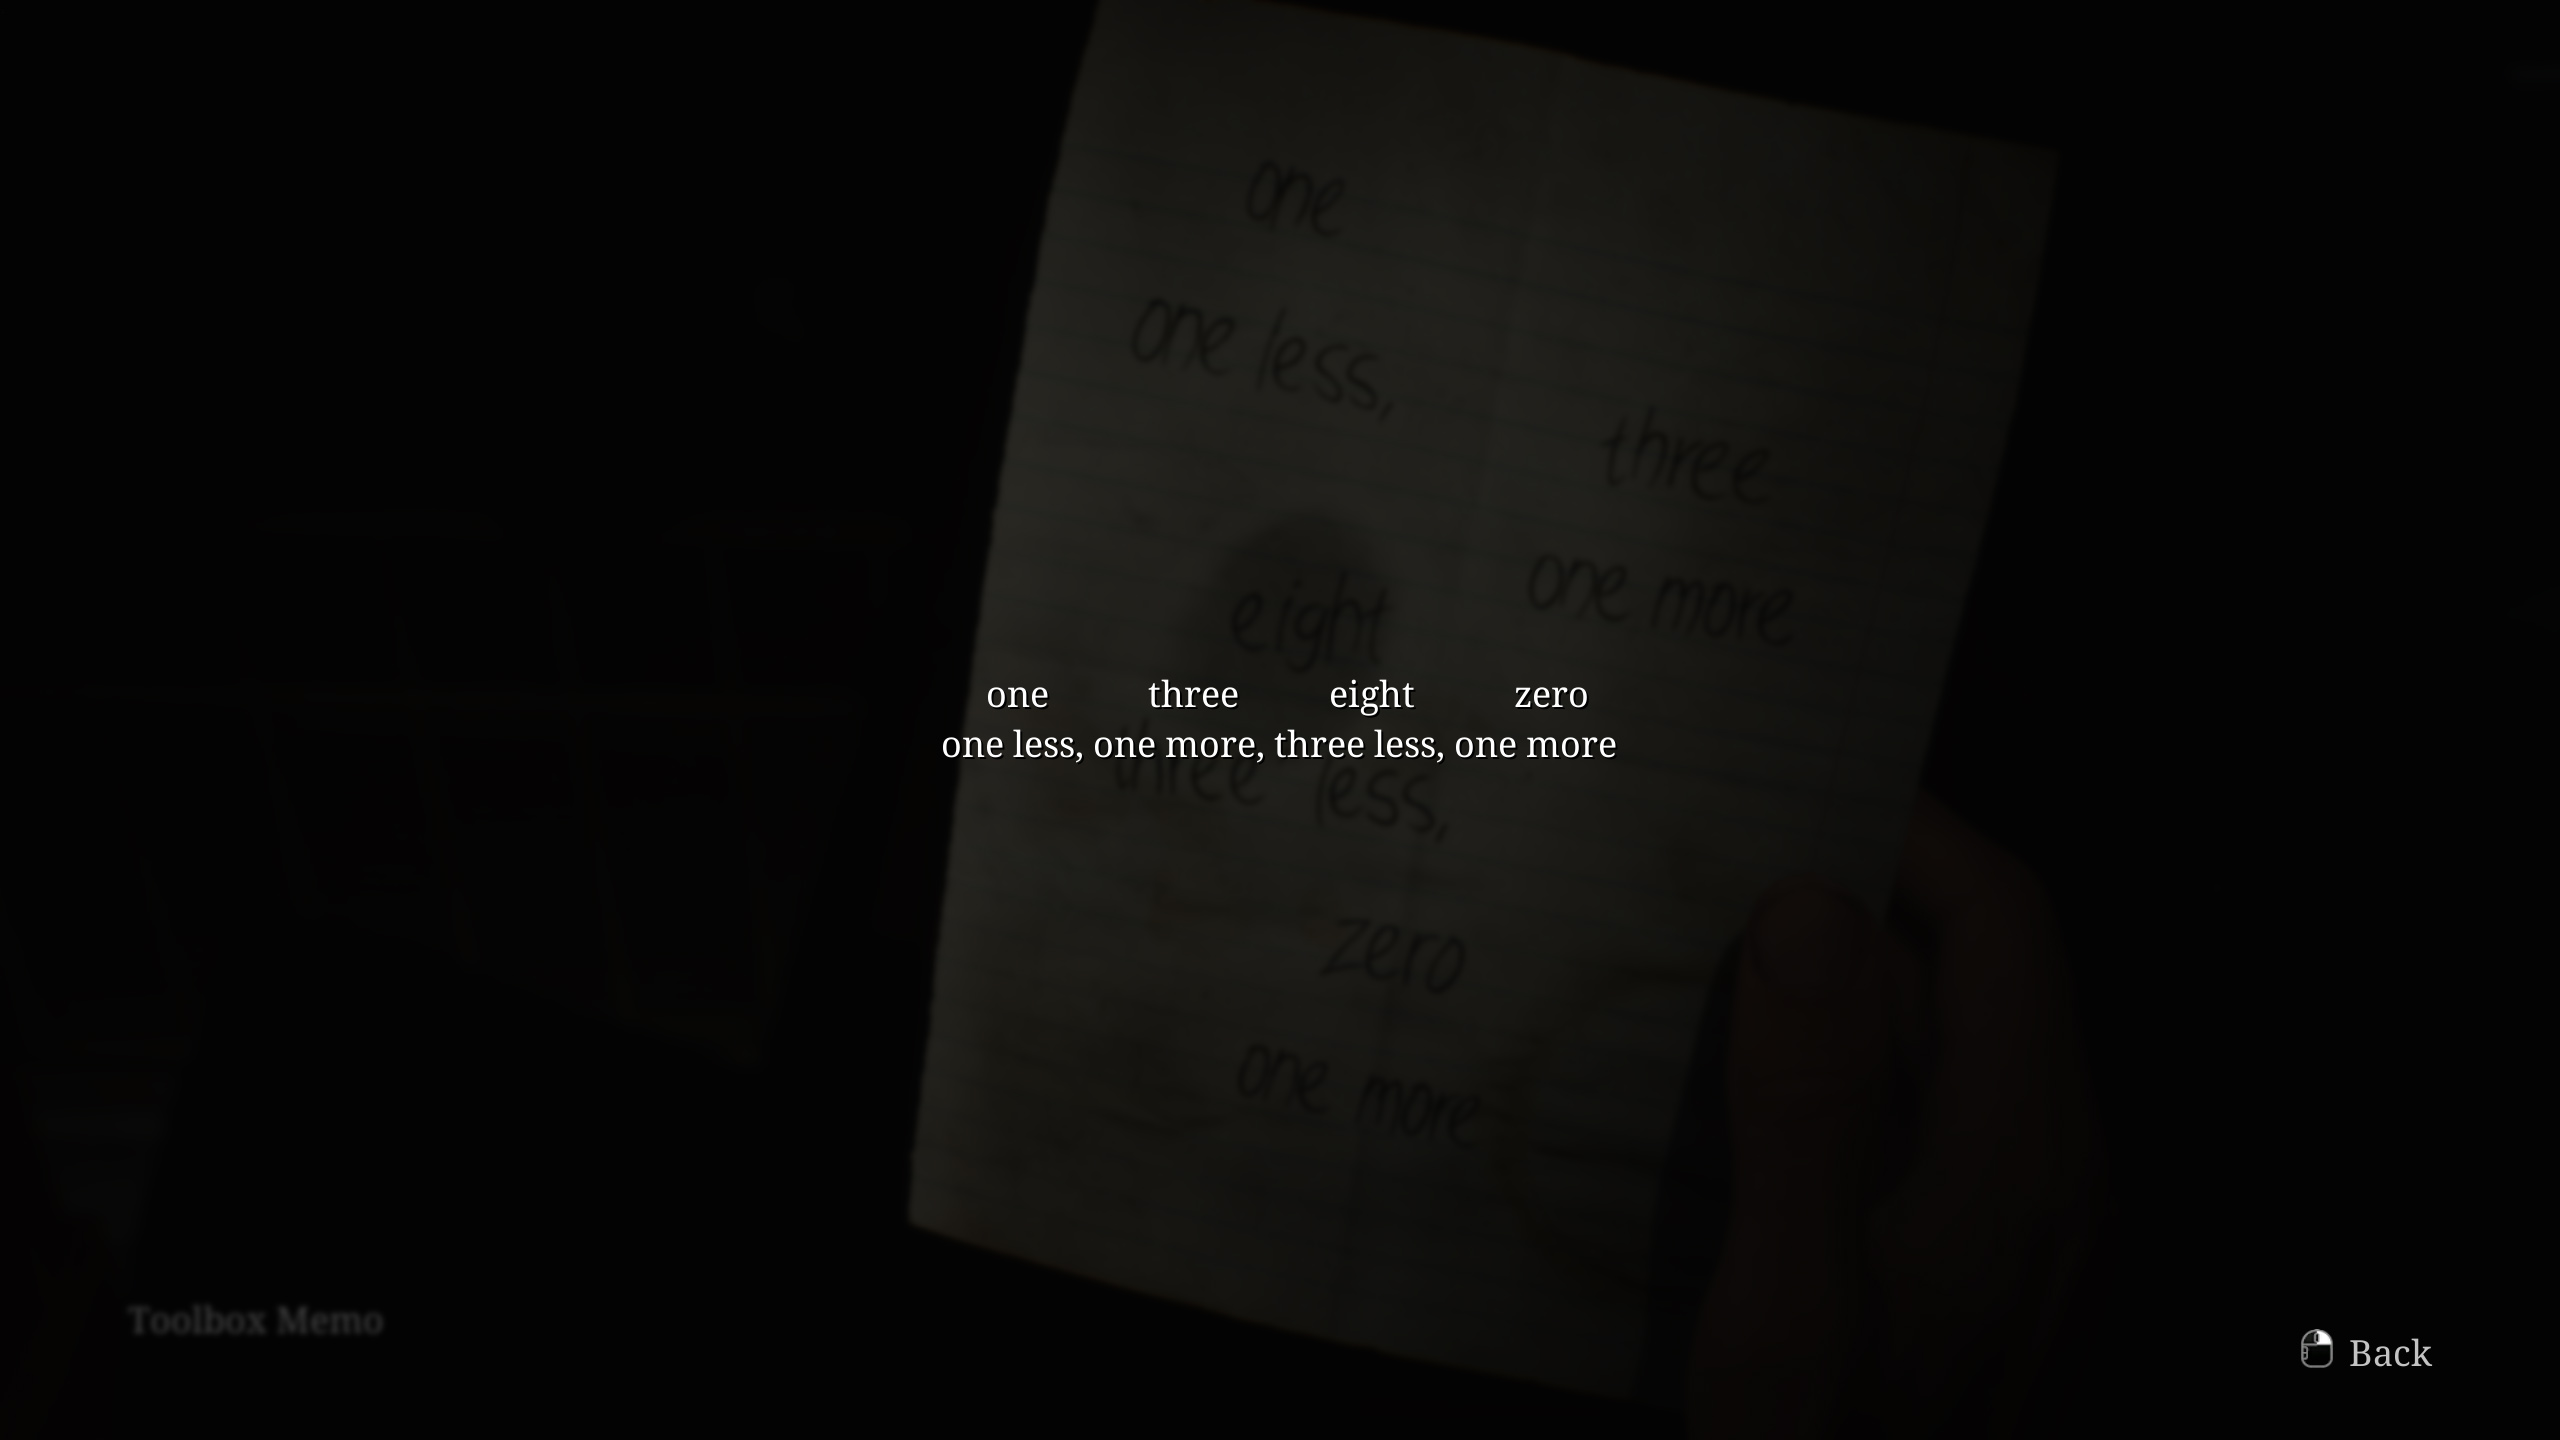
0451 Vault - Shadows of Doubt (2023)
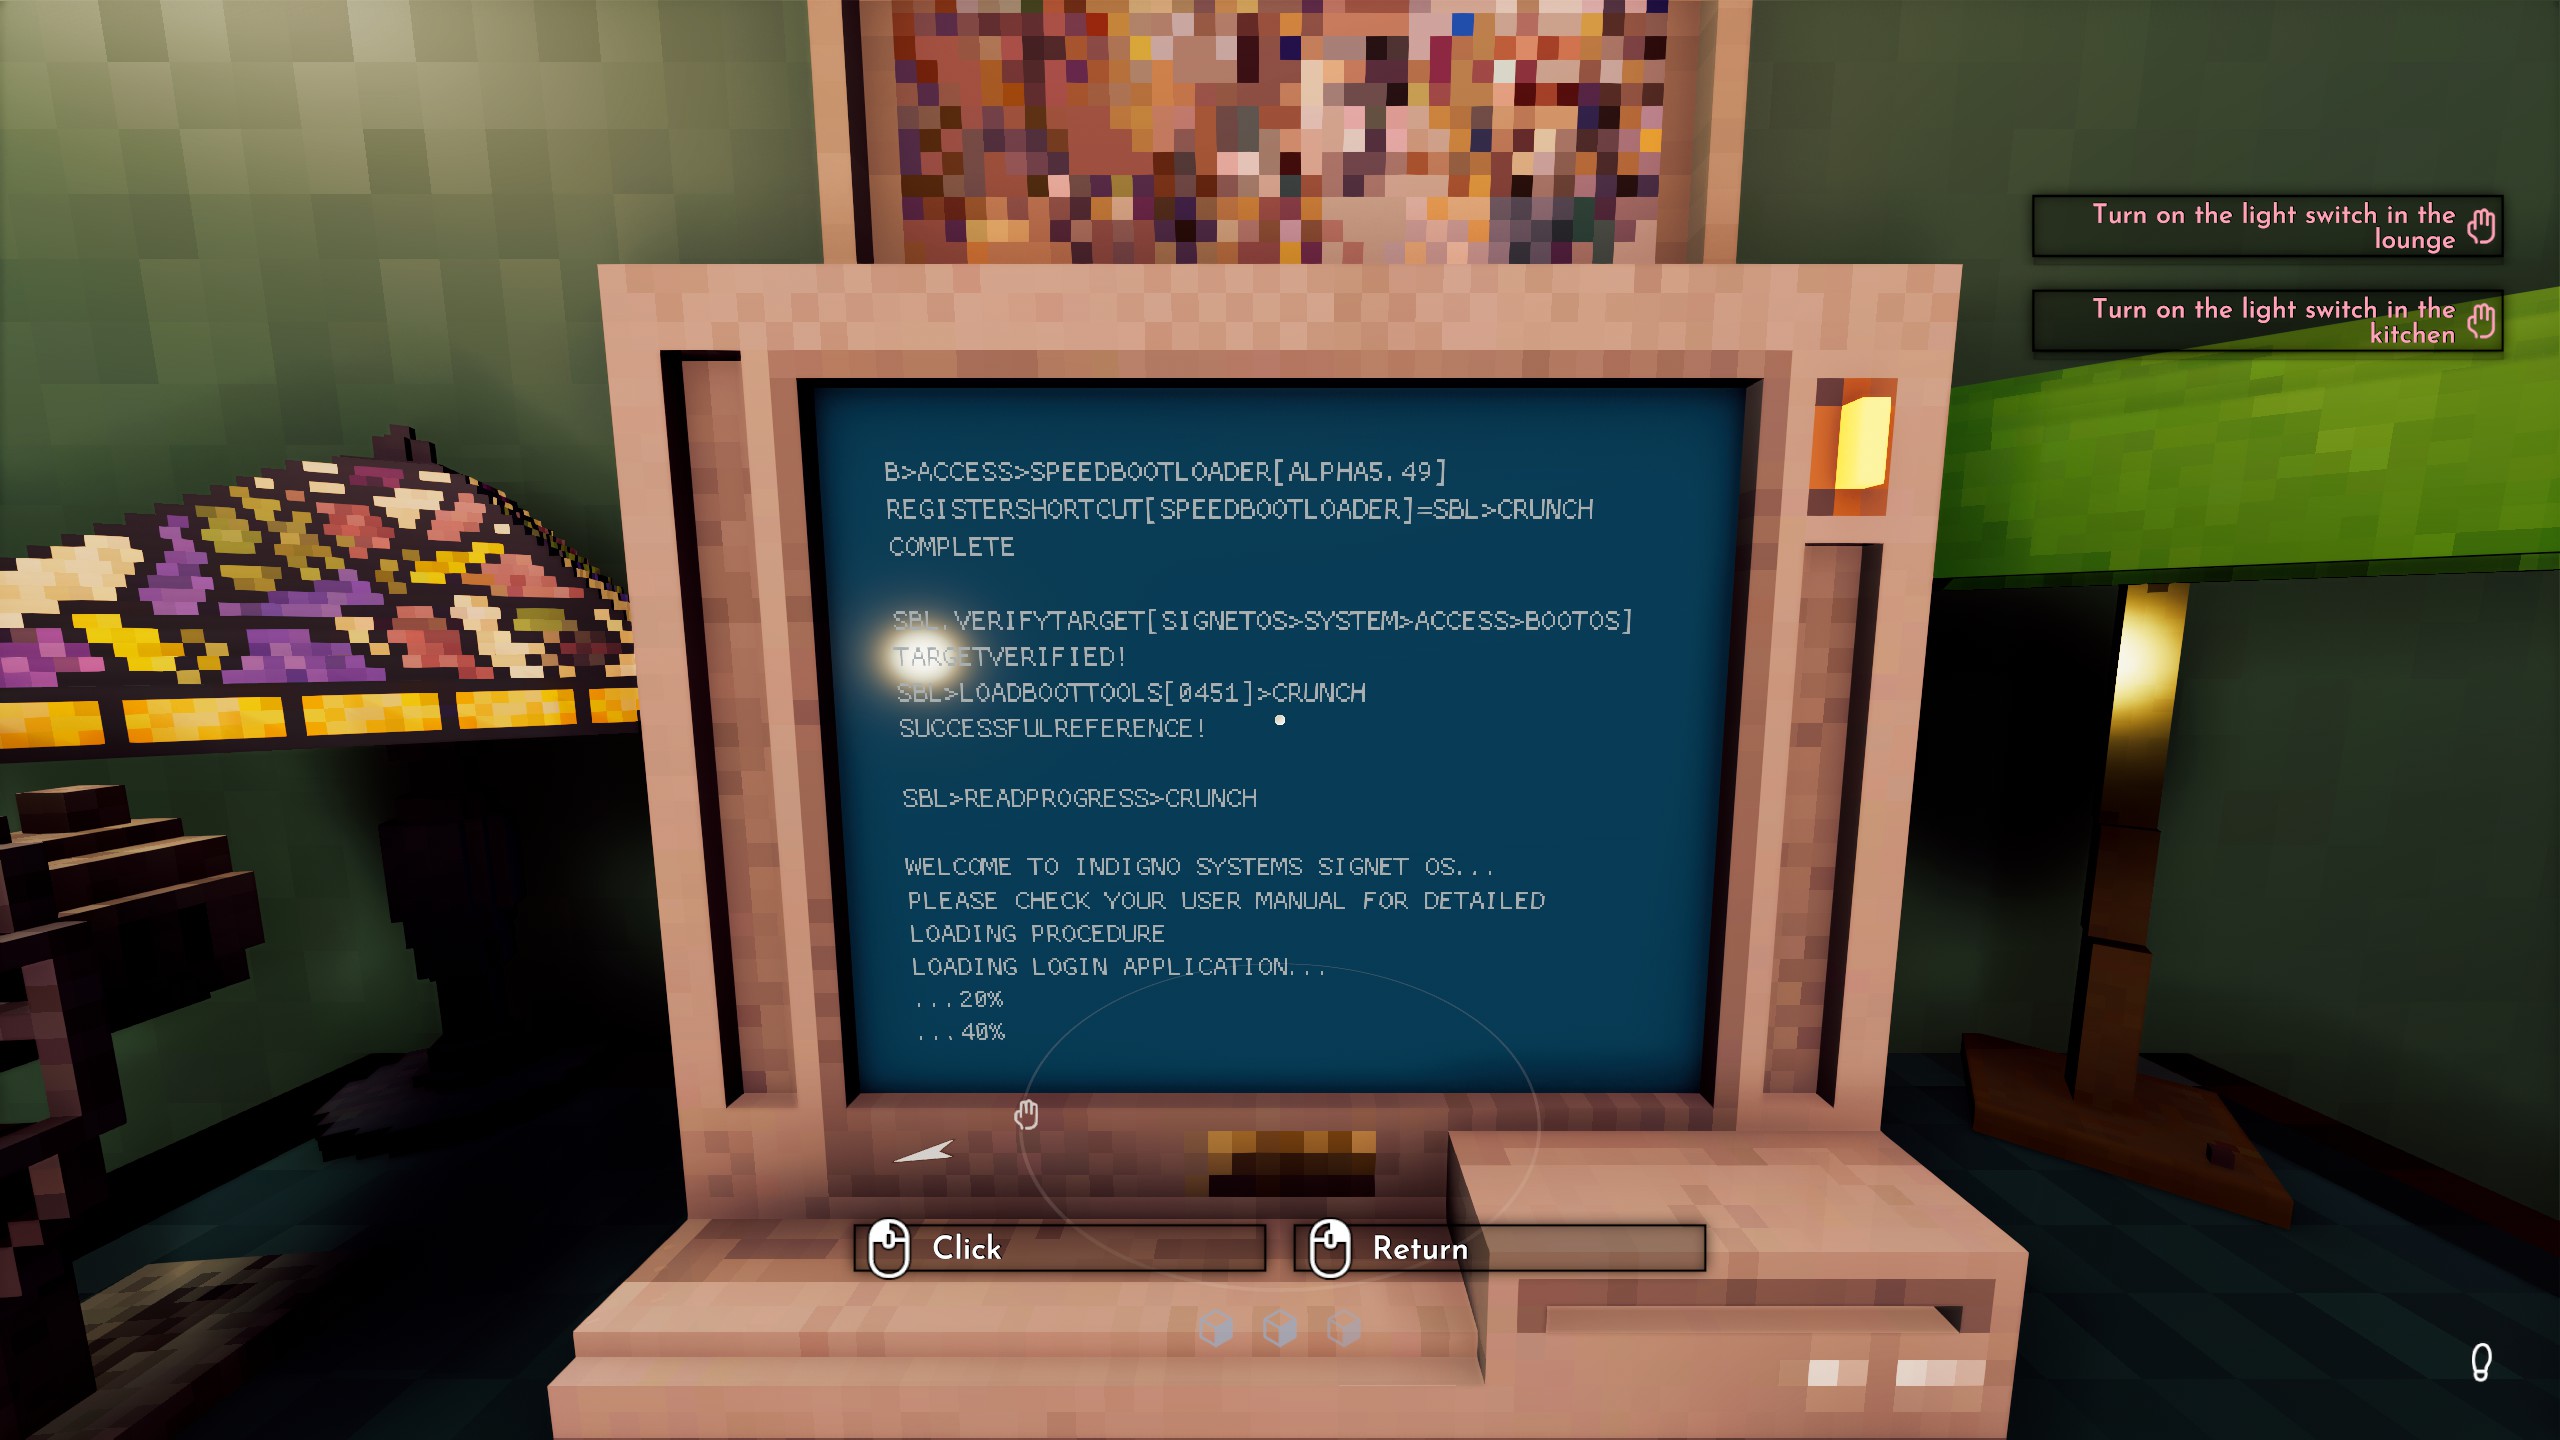
Shadows of Doubt is a first-person detective game with a procedurally generated world and cases to solve. 0451 Easter egg is easy to miss - when you start a PC in the game, it displays command line text. One of them says:
SBL>LOADBOOTTOOLS[0451]>CRUNCHCrunch? CRUNCH?! Oh no….
For more posts check archive.
subscribe via RSS